Tutorial: Product Highlights
In this tutorial, you will build an illustrative Product Highlights extension using the Node+React technology stack. You'll create a working extension that enables sellers to create highlights for required products and display the price drop tag under the price if it has been altered recently.
Prerequisite
Before starting this tutorial, make sure you have created an extension. Refer to Get Started for more details.
Tutorial is divided into following sections:
- Adding Database Configuration
- Building the extension home page
- Building 'Highlights Listing' page
- Building 'Create Highlight' page
- Injecting Javascript into the storefront theme
- Configuring Webhook
Learing Outcomes
- How to call Fynd Commerce SDK methods
- Build Extension UI using the Nitrozen design system
- Create script tag binding to inject script tag in storefront to render extension UI elements within storefront theme
- Configure Webhooks for listening to required events
Download the Product Highlight Example Extension
To view the complete code used for the Product Highlight example extension, you can download the source code from GitHub. To learn about the code step-by-step, we recommend you follow this tutorial series.
Adding Database Configuration
Step 1: Populate Test Products in Your Development Account
- Run the following command to login to FDK-CLI:
fdk login
If logging in the previous step has been completed, there is no need to log in again. This step can be skipped.
After login, you can run fdk user to verify if you've logged in.
- Run the following command:
fdk populate
- Provide company id of required development account to populate test products in it.
Step 2: Provide MongoDB Configuration
- Add port and MongoDB local URL in
/.envfile.
MONGODB_URI="mongodb://localhost:27017/productHighlights"
PORT=8080
- Add MongoDB URL in
/app/config.jsfile.
mongodb: {
    uri: {
      doc: "Mongodb uri",
      default: "",
      env: 'MONGODB_URI'
    }
  },
Step 3: Preview the Changes
- Preview the changes using these steps
Building the Extension Home Page
In this section, you'll use Node.js, React, MongoDB, and Nitrozen components to build your Extension home page.
This section consists of three steps:
- Create schema for saving product and its highlights using Mongoose library.
- Make changes in the Extension backend.
- Add additional components to the Home page of the Extension Frontend.
Step 1: Create MongoDB Schema
The app needs a database to store the Product details so sellers can view and edit the saved product highlights.
The database collection includes product highlights and basic details about the product such as name, product brand, product slug, and product item code.
- Run the following commands to install
mongoosepackage:
npm i mongoose
- Create new
/app/db/mongo.jsfile and add the following code to the file:
const config = require('../config');
const mongoose = require('mongoose');

// mongodb connection
mongoose.connect(config.mongodb.uri);

const ProductSchema = new mongoose.Schema({
  name: {
    type: String,
  },
  image: {
    type: String
  },
  brand_name: {
    type: String
  },
  category_slug: {
    type: String
  },
  highlights: {
    type: [String]
  },
  price: {
    type: Object
  },
  enablePriceDrop: {
    type: Boolean,
    default: false
  }
})

const ProductHighlightSchema = new mongoose.Schema({
  company_id:  {
    type: String,
  },
  application_id: {
    type: String,
  },
  product_item_code: {
    type: Number,
    unique: true,
    index: true
  },
  product_slug: {
    type: String,
    unique: true,
    index: true
  },
  product: {
    type: ProductSchema
  },
  is_active: {
    type: Boolean,
    default: false
  }
})

const ProductHighlightRecord = mongoose.model("productHighlight", ProductHighlightSchema);

module.exports = { ProductHighlightRecord }
Step 2: Update the Backend API
- Change the name of
/app/routes/v1.router.jsfile to/app/routes/product.router.jsand make changes to theGET/applicationsAPI.
const { ProductHighlightRecord } = require('../db/mongo')

// Get applications list
router.get('/applications', async function view(req, res, next) {
    try {
        const {
            platformClient
        } = req;
        const companyId = req.fdkSession.company_id;

        let applications = await platformClient.configuration.getApplications({
            pageSize: 1000,
            q: JSON.stringify({"is_active": true})
        })

        let activeApplicationSet = new Set();
        let productSchema = await ProductHighlightRecord.find({company_id: companyId, is_active: true}, {application_id: 1});
        for (let index = 0; index < productSchema.length; index++) {
            activeApplicationSet.add(productSchema[index].application_id.toString());
        }
        for (let index = 0; index < applications?.items?.length; index++) {
            applications.items[index] = {
                ...applications?.items?.[index],
                is_active: activeApplicationSet.has(applications.items[index]._id.toString()) ? true : false
            }
        }
        return res.status(200).json(applications);

    } catch (err) {
        next(err);
    }
});
- Do the following changes in
/app/server.jsfile:
- Change line-3 and line-31 from
3.    const v1Router = require("./routes/v1.router");
31.   apiRoutes.use('/v1.0', v1Router)
to
3.    const productRouter = require("./routes/product.router");
31.   apiRoutes.use('/v1.0', productRouter)
Step 3: Changes in the Front End
We’ll be using the Badge and Input components and SvgIcArrowNext Icon of the Nitrozen library
Check out Nitrozen’s storybook for detailed documentation and usage instructions.
- Open
/src/views/Home.jsx - Delete the contents of the file.
- Add the following code:
import React, { useState, useEffect } from "react";
import { useNavigate, useParams } from 'react-router-dom'
import "./style/home.css";
import Loader from "../components/Loader";
import { Badge, SvgIcArrowNext, Input } from "@gofynd/nitrozen-react";
import MainService from "../services/main-service";
export default function Home() {
const [pageLoading, setPageLoading] = useState(false);
const [applicationList, setApplicationList] = useState([]);
const [allApplications, setAllApplications] = useState([]);
const navigate = useNavigate();
const { company_id } = useParams();
useEffect(() => {
fetchApplications();
}, []);
const fetchApplications = async () => {
setPageLoading(true);
try {
const { data } = await MainService.getAllApplications();
setAllApplications(data.items);
const temp = data.items.map((ele) => {
ele.text = ele.name;
ele.value = ele._id;
ele.image = ele.logo;
ele.logo = ele.image && ele.image.secure_url;
return ele;
});
setApplicationList(temp);
setPageLoading(false);
} catch (e) {
setPageLoading(false);
}
};
function searchApplication(event) {
let searchText = event.target.value;
if (!searchText) {
setApplicationList(allApplications.map((app) => app));
} else {
setApplicationList(
allApplications.filter((item) => {
return item.name.toLowerCase().includes(searchText.toLowerCase());
})
);
}
}
function clickOnSalesChannel(application_id) {
navigate(`/company/${company_id}/${application_id}/product-list`)
}
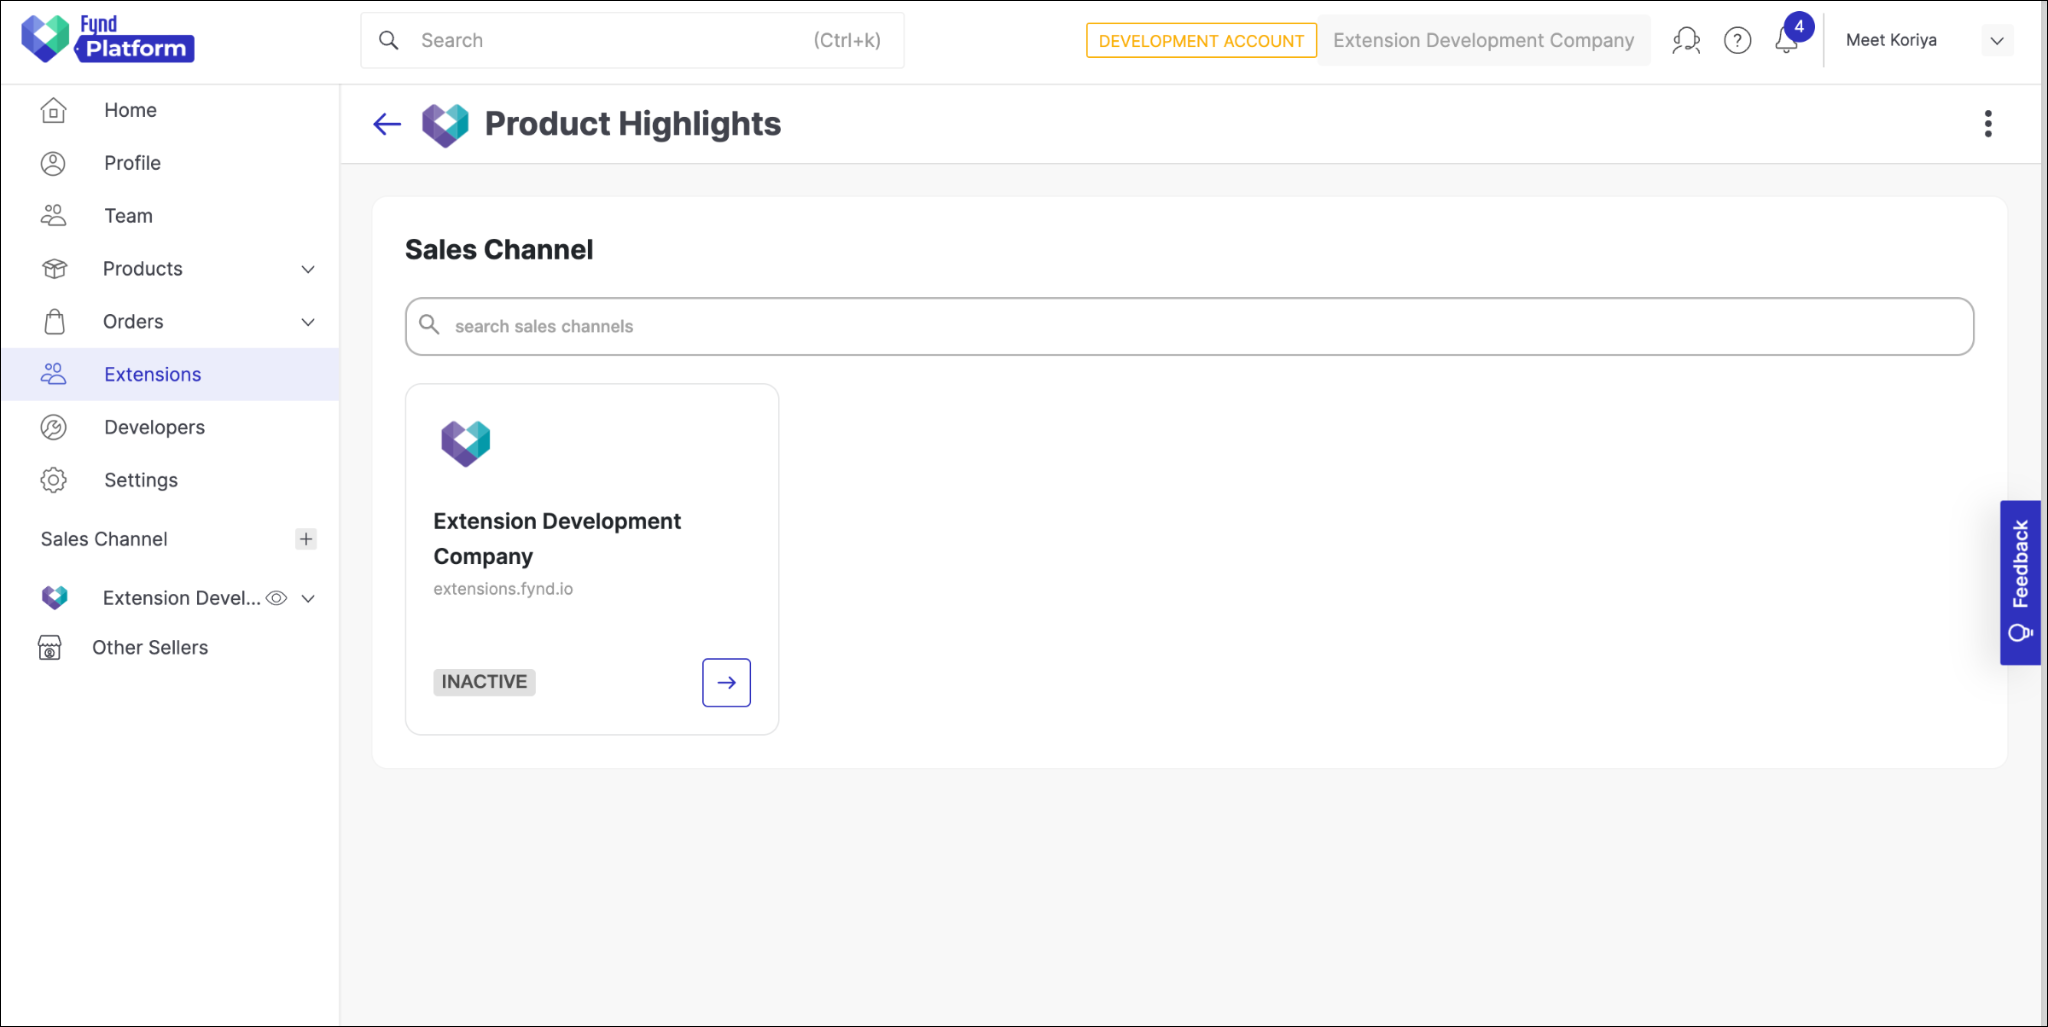
return (
<>
{pageLoading ? (
<Loader />
) : (
<div className="application-container">
<div className="saleschannel-title">Sales Channel</div>
<div className="search-box">
<Input
showSearchIcon
placeholder='search sales channels'
disabled={ Object.keys(allApplications).length === 0 ? true : false }
onChange={searchApplication}
/>
</div>
<div className="sales-channels-container">
{applicationList.map((application) => {
return (
<div className="app-box">
<div className="logo">
<img src={application.logo ? application.logo : "https://platform.fynd.com/public/admin/assets/pngs/fynd-store.png"} alt="logo" />
</div>
<div className="line-1">{application.name}</div>
<div className="line-2">{application.domain.name}</div>
<div className="button-and-arrow">
<div>
<Badge
fill
kind="normal"
state={application.is_active ? "success" : "disable"}
labelText={application.is_active ? "ACTIVE" : "INACTIVE"}
style={{
padding: "10px 6px"
}}
/>
</div>
<div className="card-arrow">
<div className="card-arrow-box"
onClick={() => clickOnSalesChannel(application._id)}
>
<SvgIcArrowNext
className="arrow-next"
/>
</div>
</div>
</div>
</div>
);
})}
{applicationList.length % 3 === 2 && (
<div className="app-box hidden"></div>
)}
</div>
</div>
)}
</>
);
}
Now, update the CSS file for the above code
- Open
/src/views/style/home.css - Delete the contents of the file.
- Add the following code:
CSS written in this file will have an impact on the entire project.
html {
  height: 100%;
  width: 100%;
  font-size: 8px;
}

body {
  margin: 0;
  font-family: Inter;
  background-color: #f8f8f8 !important;
  width: 100%;
  height: 100%;
  @media @mobile {
    -webkit-tap-highlight-color: transparent;
  }
}

.application-container {
  font-family: Inter;
  position: relative;
  box-sizing: border-box;
  background: #fff;
  border: 1px solid #f3f3f3;
  border-radius: 12px;
  padding: 24px;
  margin: 24px;
}

.saleschannel-title {
  font-weight: 700;
  font-size: 20px;
  margin-bottom: 8px;
}

.search-box {
  margin-top: 20px;
}

.sales-channels-container {
  display: grid;
  grid-template-columns: 25% 25% 25% 25%;
  grid-column-gap: 18px;
  grid-row-gap: 18px;
  margin-top: 20px;
  width: calc(100% - 54px);
}

.app-box {
  background-color: #ffffff;
  border: 1px solid #e4e5e6;
  padding: 20px;
  border-radius: 12px;
}

.app-box .logo {
  width: 48px;
  height: 48px;
}

.app-box .logo img {
  width: 100%;
  height: auto;
}

.app-box .line-1 {
  font-weight: 600;
  font-size: 16px;
  line-height: 26px;
  margin-top: 20px;
}

.app-box .line-2 {
  color: #9b9b9b;
  line-height: 22px;
  font-size: 12px;
}

.app-box + .app-box:nth-child(3n + 1) {
  margin-left: 0;
}

/* card footer elements */
.app-box .button-and-arrow {
  display: flex;
  justify-content: space-between;
  align-items: center;
  margin-top: 40px;
}

.card-arrow-box {
  border: 1px solid #2E31BE;
  border-radius: 4px;
  height: 36px;
  width: 36px;
  display: flex;
  align-items: center;
  justify-content: center;
}

.card-arrow-box:hover {
  transition-duration: 0.4s;
  background-color: #2E31BE;
  cursor: pointer;
}

.arrow-next {
  color: #2E31BE;
  width: 16px;
  height: auto;
}

.card-arrow-box:hover .arrow-next {
  transition-duration: 0.4s;
  color: #ffffff;
  cursor: pointer;
}

.hidden {
  visibility: hidden;
}
Step 4: Restart the Server and Refresh Extension Page in Development Account
Building 'Highlights Listing' page
Step 1: Create Backend APIs
- Add the following code to the
/app/routes/product.route.js.
// get product highlights list
router.get("/:application_id/highlight/list", async function view(req, res, next) {
    try {
        const { application_id } = req.params;
        const companyId = Number(req.fdkSession.company_id);

        let data = await ProductHighlightRecord.find({application_id: application_id, company_id: companyId}).exec();
        return res.status(200).json(data);
    } catch(error) {
        next(error)
    }
})

// get product highlight by product item code or slug
router.get("/:application_id/highlight", async function view(req, res, next) {
    try {
        const { application_id } = req.params;
        let { slug, item_code } = req.query;
        const companyId = Number(req.fdkSession.company_id);
        // const companyId = 11197;
        let data;

        if (item_code) {
            item_code = Number(item_code)
            data = await ProductHighlightRecord.findOne({
                application_id: application_id, company_id: companyId, product_item_code: item_code
            }).exec();
        } else if (slug) {
            data = await ProductHighlightRecord.findOne({
                company_id: companyId, application_id: application_id, product_slug: slug
            })
        } else {
            return res.status(400).json({"Error": "Invalid Item code or slug in the query param"});
        }

        return res.status(200).json(data);
    } catch(error) {
        next(error);
    }
})

// delete product highlight by item code or slug
router.delete("/:application_id/highlight", async function view(req, res, next) {
    try {
        const { application_id } = req.params;
        const { slug } = req.query;
        const item_code = Number(req.query.item_code);
        const companyId = Number(req.fdkSession.company_id);
        let data;

        if (item_code !== "") {
            data = await ProductHighlightRecord.deleteOne({
                application_id: application_id, company_id: companyId, product_item_code: item_code
            }).exec();
        } else if (slug !== "") {
            data = await ProductHighlightRecord.deleteOne({
                company_id: companyId, application_id: application_id, product_slug: slug
            }).exec();
        } else {
            throw new Error("Invalid Item code or slug in query param");
        }

        return res.status(200).json(data);
    } catch(error) {
        next(error);
    }
})
- Add the following endpoints to the
Endpointsobject in/src/service/endpoint.service.jsfile:
GET_HIGHLIGHT_LIST(application_id) {
    return urlJoin(envVars.EXAMPLE_MAIN_URL, `api/v1.0/${application_id}/highlight/list`);
},
PRODUCT_HIGHLIGHT(application_id) {
    return urlJoin(envVars.EXAMPLE_MAIN_URL, `api/v1.0/${application_id}/highlight`);
},
- Add the following methods to the
MainServiceobject in/src/service/main-service.jsfile:
// product highlights
getHighlightList(application_id) {
  return axios.get(URLS.GET_HIGHLIGHT_LIST(application_id));
},
getProductHighlight(application_id, item_code="", slug="") {
  return axios.get(URLS.PRODUCT_HIGHLIGHT(application_id), {params: {item_code, slug}});
},
deleteProductHighlight(application_id, item_code="", slug="") {
  return axios.delete(URLS.PRODUCT_HIGHLIGHT(application_id), {params: {item_code, slug}});
},
Step 2: Create FrontEnd Page
-
In the
/src/views/directory create a new file calledProductList.jsxand add the following code to the file:import React, { useEffect, useState, useRef } from "react";
import Loader from "../components/Loader";
import { Button, Input, ToggleButton, SvgIcEdit, SvgIcTrash, SvgIcArrowBack } from "@gofynd/nitrozen-react";
import { useParams, useNavigate } from 'react-router-dom'
import styles from './style/productList.module.css';
import MainService from "../services/main-service";
function ProductCard({productItem, onProductDelete}) {
const [toggleState, setToggleState] = useState(productItem.is_active);
const { company_id, application_id } = useParams();
const dummyState = useRef(false);
const navigate = useNavigate();
useEffect(() => {
if (dummyState.current) {
(async () => {
if (toggleState) {
await MainService.addInjectableTag(application_id, productItem.product_item_code);
} else {
await MainService.deleteInjectableTag(application_id, productItem.product_item_code);
}
})()
}
dummyState.current = true;
}, [application_id, productItem.product_item_code, toggleState])
return (
<>
<div className={styles.product_card}>
<div className={styles.card_left}>
{/* PRODUCT LOGO */}
<div className={styles.image_card}>
<img className={styles.logo} src={productItem.product.image} alt="product_image" />
</div>
{/* PRODUCT META */}
<div className={styles.product_metadata}>
<div className={styles.product_metadata_header}>
<div className={styles.header_name}>
{productItem.product.name}
</div>
<div className={styles.pipe}>
|
</div>
<span className={styles.item_code}>
Item code: {productItem.product_item_code}
</span>
</div>
<div className={styles.product_metadata_brand}>
{productItem.product.brand_name}
</div>
<div className={styles.product_metadata_category}>
category: {productItem.product.category_slug}
</div>
</div>
</div>
{/* TOGGLE BUTTON */}
<div className={styles.product_toggle_button}>
<ToggleButton
id={productItem.product_item_code}
size={"small"}
value={toggleState}
onToggle={async (event) => {
setToggleState((pre) => !pre);
}}
/>
</div>
<div className={styles.product_delete_edit}>
{/* DELETE SVG */}
<div>
<SvgIcTrash
color="#2E31BE"
className={styles.product_delete}
onClick={async () => {
if (toggleState) {
await MainService.deleteInjectableTag(application_id, productItem.product_item_code);
}
await MainService.deleteProductHighlight(application_id, productItem.product_item_code);
onProductDelete(productItem.product_item_code);
}}
/>
</div>
{/* EDIT SVG */}
<div>
<SvgIcEdit
color="#2E31BE"
className={styles.product_edit}
onClick={() => {
navigate(`/company/${company_id}/${application_id}/highlight/${productItem.product_item_code}`);
}}
/>
</div>
</div>
</div>
</>
)
}
export default function ProductList() {
const [pageLoading, setPageLoading] = useState(false);
const [productItems, setProductItems] = useState([]);
const [allProductItems, setAllProductItems] = useState([]);
const [searchTextValue, setSearchTextValue] = useState("");
const navigate = useNavigate();
const { company_id, application_id } = useParams();
async function fetchProductItems() {
const { data } = await MainService.getHighlightList(application_id);
setAllProductItems(data);
setProductItems(data);
setPageLoading(false);
}
function createProductHighlights() {
navigate(`/company/${company_id}/${application_id}/highlight/create`)
}
function onProductDelete(product_item_code) {
setAllProductItems((prevState) => {
let findIndex = prevState.findIndex(product => product.product_item_code === product_item_code);
prevState.splice(findIndex, 1);
let newArr = [...prevState]
return newArr;
})
}
useEffect(() => {
if (!searchTextValue) {
setProductItems(allProductItems.map((product) => product))
} else {
setProductItems(
allProductItems.filter((item) => {
return item.product.name.toLowerCase().includes(searchTextValue.toLowerCase());
})
)
}
}, [allProductItems, searchTextValue]);
useEffect(() => {
setPageLoading(true);
fetchProductItems()
}, []);
return (
<>
{ pageLoading ? (
<Loader />
) : (
<div className={styles.main_wrapper}>
<div className={styles.sticky_header}>
<div className={styles.navbar_left_section}>
{/* BACK ARROW */}
<div className={styles.back_arrow}>
<SvgIcArrowBack
color='#2E31BE'
style={{
width: "24px",
height: "auto"
}}
onClick={() => {
navigate(`/company/${company_id}/`);
}}
/>
</div>
{/* SEARCH INPUT */}
<div className={styles.search_product_highlight}>
<Input
showSearchIcon
className={styles.search_input}
type="text"
placeholder="search by product name"
value={searchTextValue}
disabled={Object.keys(allProductItems).length === 0 ? true : false }
onChange={(event) => {
setSearchTextValue(event.target.value);
}}
/>
</div>
</div>
{/* CREATE HIGHLIGHT BUTTON */}
<div className={styles.create_highlight_button}>
<Button
onClick={() => {createProductHighlights()}}
rounded={false}
>
Create Product Highlight
</Button>
</div>
</div>
<div className={styles.product_listing}>
{productItems.map((product) => (
<ProductCard
key={product.product_item_code}
productItem={product}
onProductDelete={onProductDelete}
/>
))}
</div>
</div>
)}
</>
);
}
Step 3: Add CSS for the ProductList Component
-
In the
/src/views/style/directory, create a new file calledproductList.module.cssand add the following code to the file:.main_wrapper {
font-family: Inter;
position: relative;
box-sizing: border-box;
background: #fff;
border: 1px solid #f3f3f3;
border-radius: 12px;
padding: 24px;
margin: 24px;
}
.sticky_header {
background-color: #ffffff;
display: flex;
flex-direction: row;
align-items: center;
justify-content: space-between;
}
.back_arrow {
cursor: pointer;
}
.navbar_left_section {
display: flex;
align-items: center;
}
/* button */
.create_highlight_button {
margin: 12px 12px;
max-height: 48px;
}
/* Product search */
.search_product_highlight {
max-width: 480px;
min-width: 480px;
margin: 0 24px;
}
.search_input {
height: 18px;
}
/* Product listing */
.product_listing {
margin: 0 16px;
padding-top: 24px;
}
.product_card {
display: flex;
justify-content: space-between;
border: 1px solid #e4e5e6;
min-height: 102px;
padding: 16px;
border-radius: 4px;
margin-bottom: 16px;
box-sizing: border-box;
transition: box-shadow 0.3s;
}
.product_card:hover {
box-shadow: 0px 9px 13px 0px rgba(221, 221, 221, 0.5);
}
.product_card .card_left {
display: flex;
flex-direction: row;
align-items: center;
flex: 2;
}
.product_card .image_card {
min-height: 60px;
min-width: 60px;
max-height: 60px;
max-width: 60px;
display: flex;
align-items: center;
margin: 0 12px;
}
.product_card .image_card .logo {
height: 60px;
width: 100%;
object-fit: cover;
border-radius: 50%;
}
.product_metadata {
display: flex;
flex-direction: column;
}
.product_metadata_header {
display: flex;
flex-direction: row;
align-items: center;
}
.product_metadata_header .header_name {
line-height: 21px;
margin-right: 10px;
color: #41434C;
font-weight: 600;
font-size: 14px;
-webkit-font-smoothing: antialiased;
}
.product_metadata_header .pipe {
line-height: 20px;
margin-right: 10px;
color: #9B9B9B;
font-weight: 400;
font-size: 12px;
-webkit-font-smoothing: antialiased;
}
.product_metadata_header .item_code {
line-height: 20px;
color: #9B9B9B;
font-weight: 400;
font-size: 12px;
-webkit-font-smoothing: antialiased;
}
.product_metadata_brand, .product_metadata_category {
color: #666666;
line-height: 21px;
font-weight: 400;
font-size: 12px;
-webkit-font-smoothing: antialiased;
}
.product_toggle_button {
flex: 0.5;
display: flex;
align-items: center;
justify-content: center;
}
.product_delete_edit {
display: flex;
flex-direction: row;
flex: 0.5;
align-items: center;
justify-content: space-evenly;
}
.product_delete, .product_edit {
height: 24px;
width: auto;
margin: 12px;
}
.product_edit:hover, .product_delete:hover {
cursor: pointer;
}
Step 4: Create Route for the ProductList Component
-
Using react-router to create routes for the Product List page
-
Add the following objects to the
CreateBrowserRouterlist in/src/router/index.jsfile:{
path: "/company/:company_id/:application_id/product-list/",
element: <ProductList />
}, -
Import
ProductListcomponent at the top of/src/router/index.jsfile.import ProductList from "../views/ProductList";
Step 5: Restart the Extension Server and Refresh Extension Page in Development Account
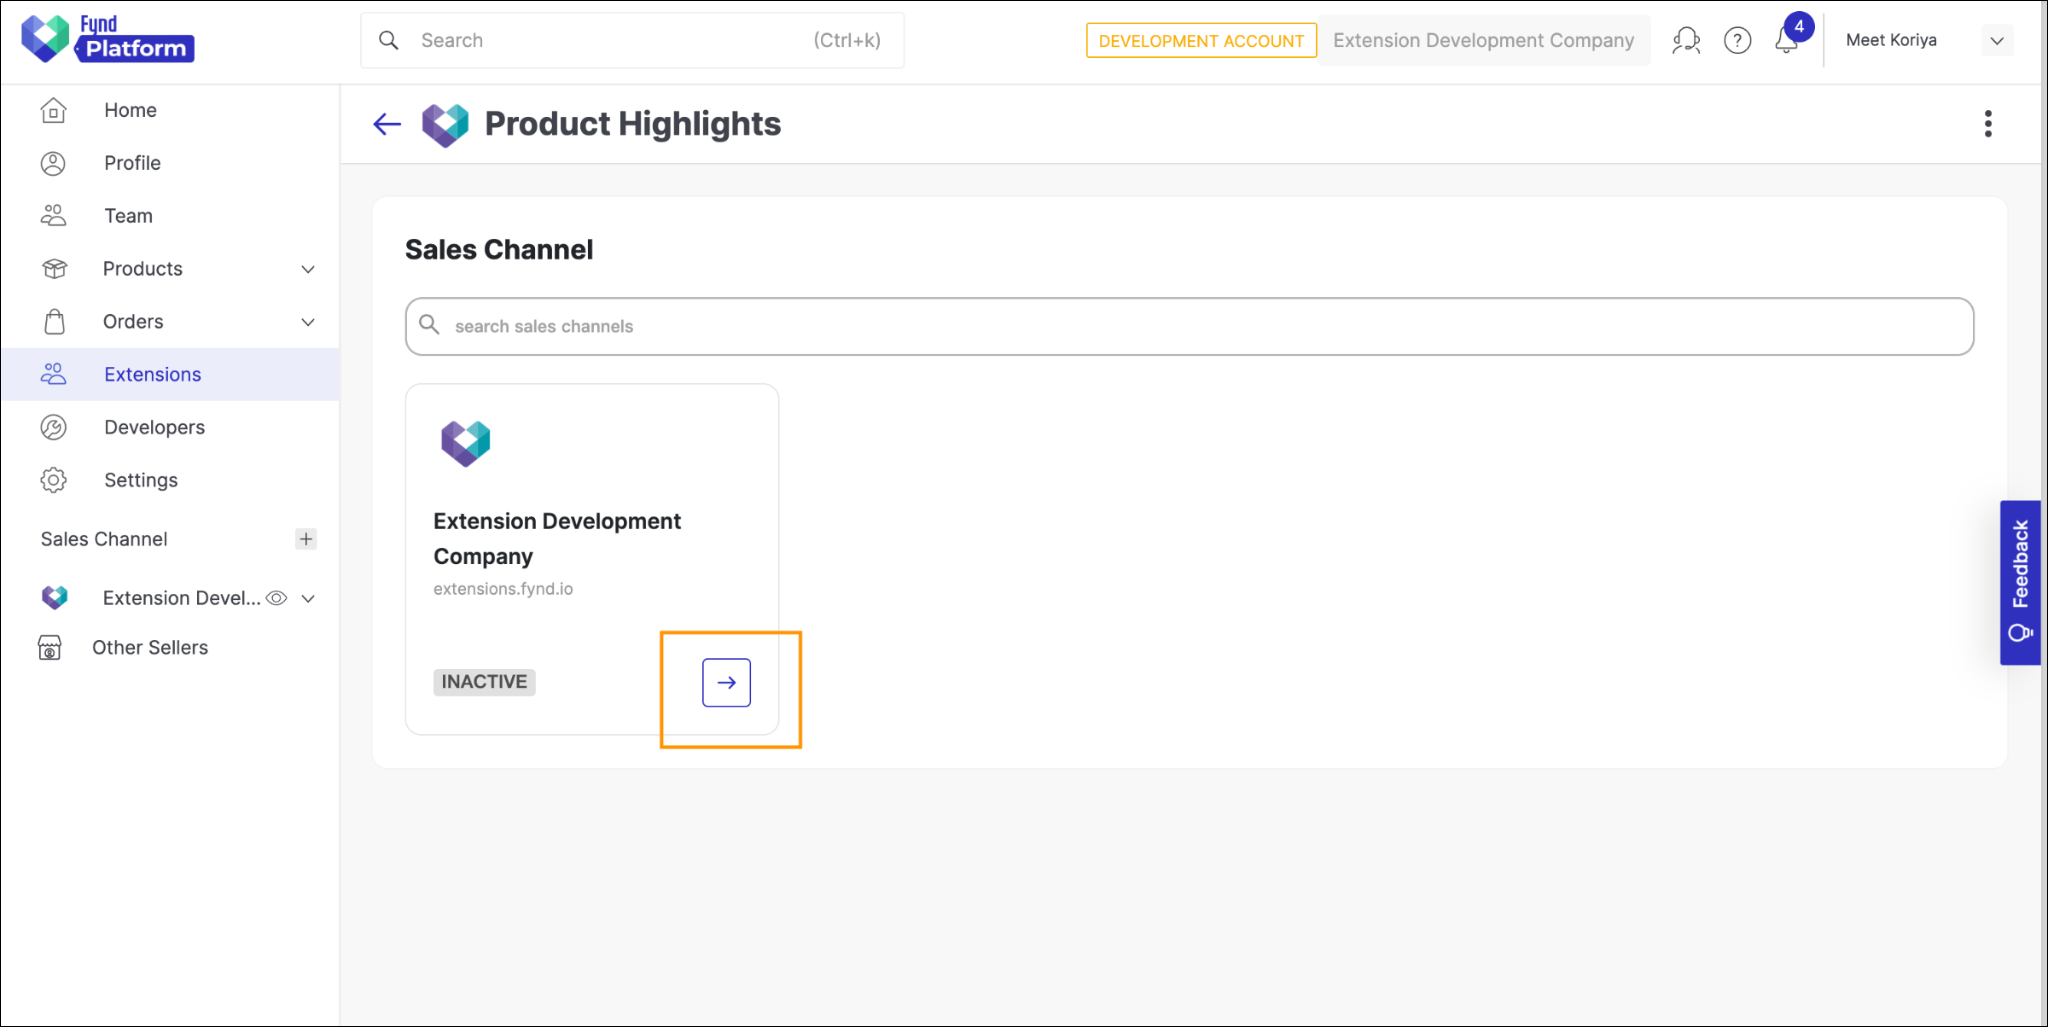
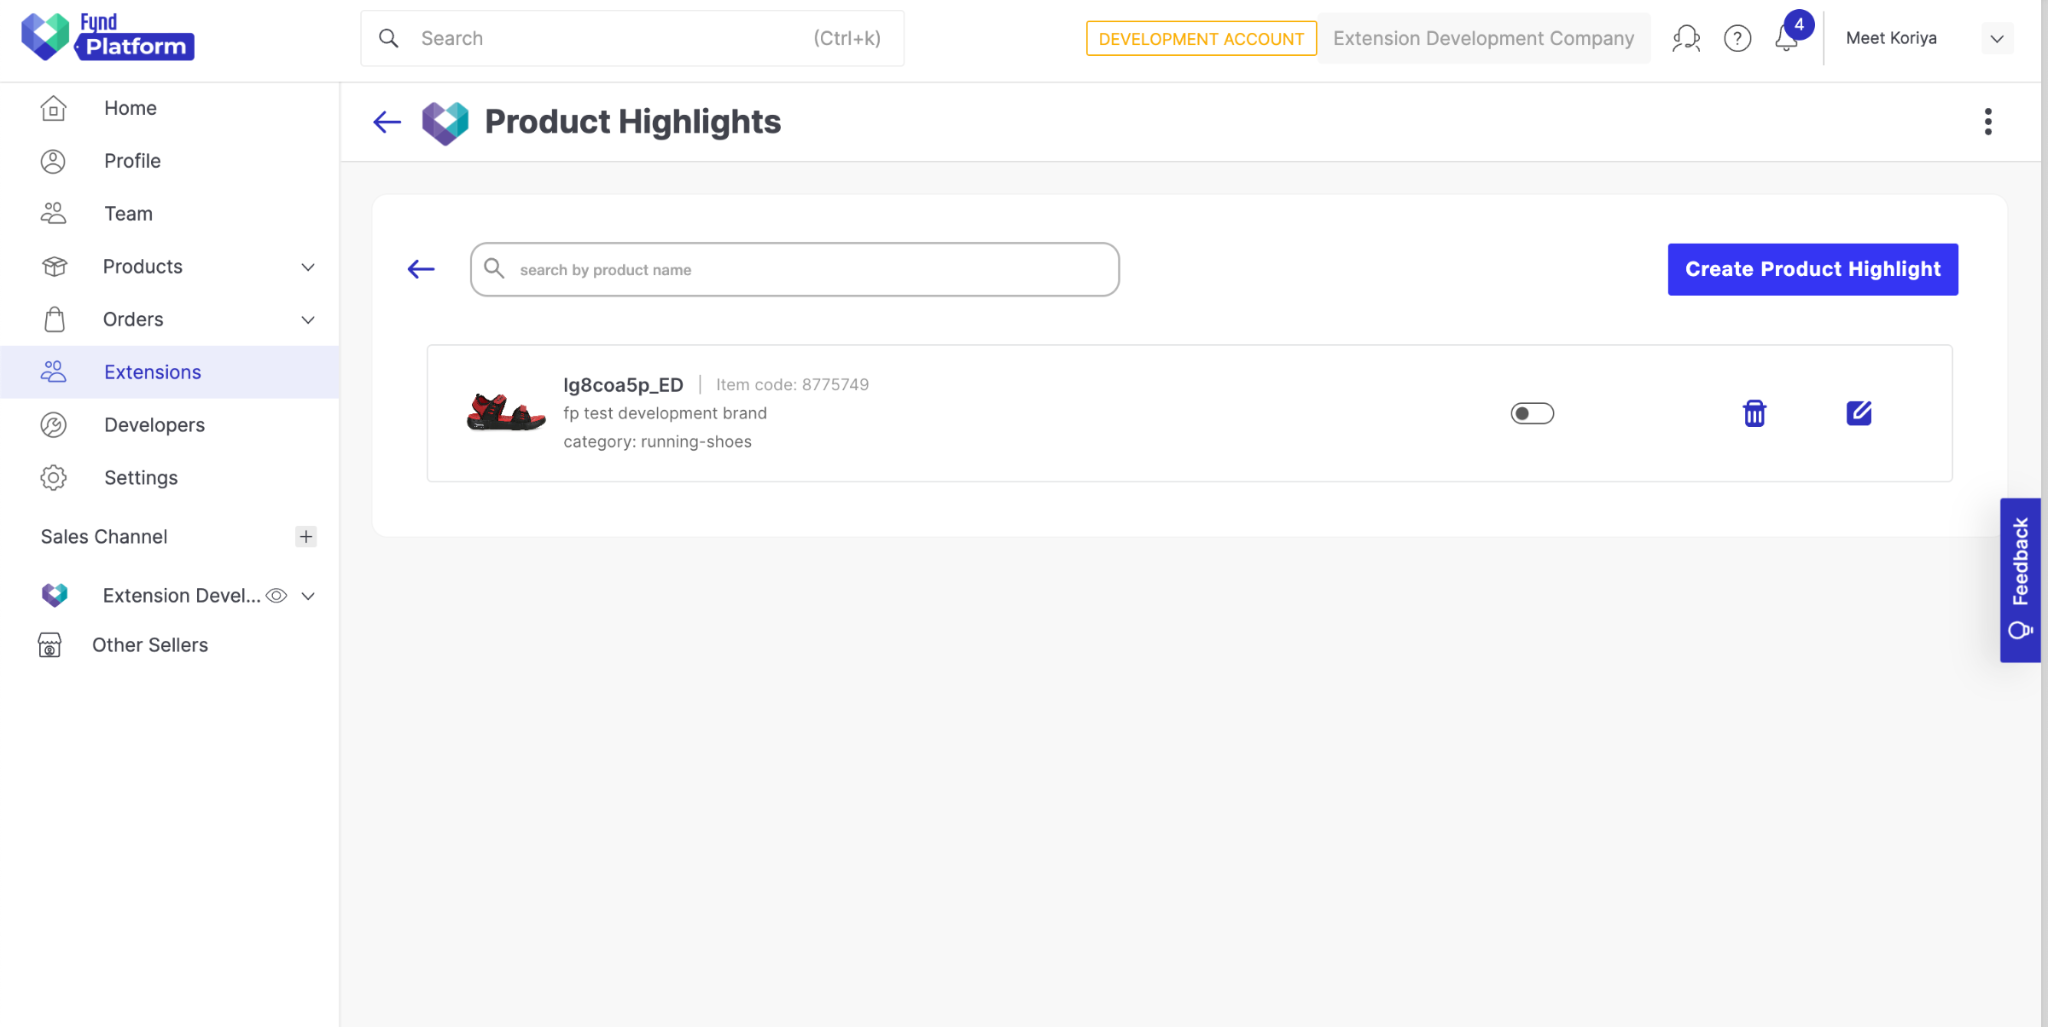
- Clicking on this arrow will redirect the user to the ProductList page.
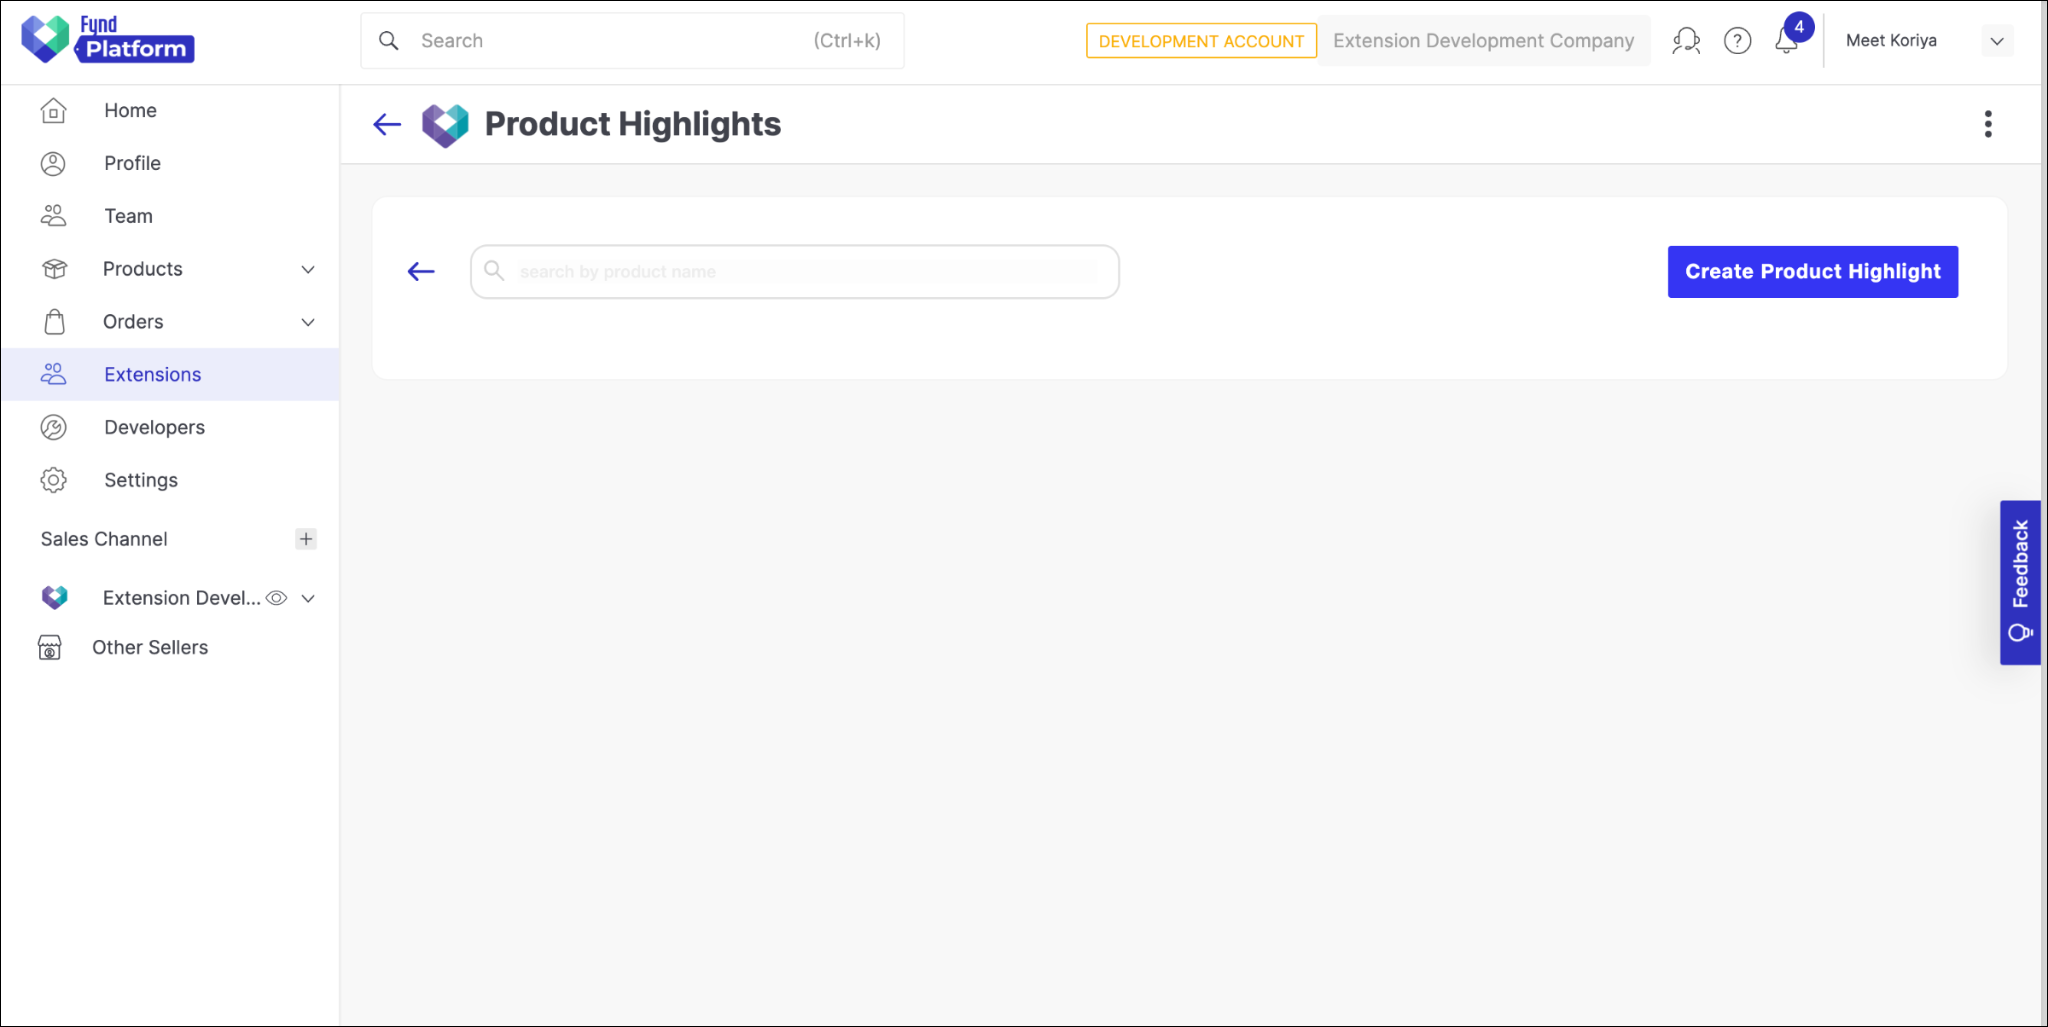
Currently, we don’t have highlights created for the products, which is why no products are showing. In order to create product highlights, we’ll need to create a CreateProductHighlight page.
Building 'Create Highlight' Page
Step 1: Create Backend APIs
- Add the following code to the
/app/routes/product.route.js:
// get product list
router.get('/:application_id/products', async function view(req, res, next) {
    try {
        const { platformClient } = req;
        const { application_id } = req.params;
        const { query } = req.query;
        let response = await platformClient.application(application_id).catalog.getAppProducts({
            pageNo: 1,
            pageSize: 10,
            q: query
        })
        return res.status(200).json(response)
    } catch(error) {
        next(error);
    }
})

// update product highlights
router.post("/:application_id/product/:item_id/highlights", async function view(req, res, next) {
    try {
        const { application_id, item_id } = req.params;
        const { product_meta, highlights, enablePriceDrop } = req.body
        const companyId = Number(req.fdkSession.company_id);

        let productHighlightRecord = await ProductHighlightRecord.findOne({
            company_id: companyId, application_id: application_id, product_item_code: item_id
        }).exec()

        if (productHighlightRecord) {
            productHighlightRecord.product.highlights = highlights;
            productHighlightRecord.product.enablePriceDrop = enablePriceDrop;
            await productHighlightRecord.save();

        } else {
            const prepareRecord = {
                company_id: companyId,
                application_id: application_id,
                product_item_code: product_meta.product_item_code,
                product_slug: product_meta.product_slug,
                product: {
                    name: product_meta.name,
                    image: product_meta.image,
                    brand_name: product_meta.brand_name,
                    category_slug: product_meta.category_slug,
                    highlights: highlights,
                    price: product_meta.price,
                    enablePriceDrop: enablePriceDrop
                },
                is_active: false
            }
            productHighlightRecord = await new ProductHighlightRecord(prepareRecord).save();
        }
        return res.status(200).json(productHighlightRecord);

    } catch(error) {
        next(error);
    }
})
- Add the following endpoints to the
Endpointsobject in/src/service/endpoint.service.jsfile:
GET_PRODUCTS(application_id) {
    return urlJoin(envVars.EXAMPLE_MAIN_URL, `api/v1.0/${application_id}/products`);
},
CREATE_PRODUCT_HIGHLIGHTS(application_id, item_id) {
    return urlJoin(envVars.EXAMPLE_MAIN_URL, `api/v1.0/${application_id}/product/${item_id}/highlights`);
},
- Add the following methods to the
MainServiceobject in/src/service/main-service.jsfile:
getAllProducts(application_id, query) {
    return axios.get(URLS.GET_PRODUCTS(application_id), {params: {query}});
},
createProductHighlights(application_id, item_id, data) {
    return axios.post(URLS.CREATE_PRODUCT_HIGHLIGHTS(application_id, item_id), data);
},
Step 2: Create FrontEnd Page
- In the
/src/views/directory, create a new file calledCreateHighlight.jsx. - Add the following code to the file:
import React, { useEffect, useState } from 'react';
import { useParams, useNavigate } from 'react-router-dom';

import {
  Button, Dropdown, Input, Checkbox,  SvgIcConfirm, SvgIcArrowBack, SvgIcTrash
} from '@gofynd/nitrozen-react';
import MainService from '../services/main-service';
import styles from './style/createHighlight.module.css'

export default function CreateHighlight() {
  // page params
  const { company_id, application_id, item_code } = useParams();

  // navigation instance
  const navigate = useNavigate();

  // application product list
  const [productItems, setProductItems] = useState([]);
  const [searchText, setSearchText] = useState('');

  // highlight text input
  const [highlightInput, setHighlightInput] = useState("");

  // locally maintained highlight list
  const [highlightList, setHighlightList] = useState([]);

  // current selected dropdown value
  const [selectedDropdownProduct, setSelectedDropdownProduct] = useState({});

  // is edit page
  const [isEdit, setIsEdit] = useState(false);
  const [editProduct, setEditProduct] = useState({});

  // price drop
  const [checkboxValue, setCheckboxValue] = useState(false);

  // handle dropdown search
  useEffect(() => {
    const delayDebounceFn = setTimeout(() => {
      console.log(searchText)
      getApplicationProductList();
    }, 500)
    return () => clearTimeout(delayDebounceFn)
  }, [searchText])

  // application product list for dropdown
  const getApplicationProductList = async () => {
    if (item_code) {
      setIsEdit(true);
      const { data } = await MainService.getProductHighlight(application_id, item_code);
      setHighlightList(data?.product?.highlights);
      setCheckboxValue(data?.product?.enablePriceDrop);
      setEditProduct({
        name: data?.product?.name,
        product_slug: data?.product_slug,
        image: data?.product?.image,
        brand_name: data?.product?.brand_name,
        category_slug: data?.product?.category_slug,
        product_item_code: data?.product_item_code
      })

    } else {
      const { data } = await MainService.getAllProducts(application_id, searchText);
      setProductItems(data.items);
    }
  }

  // handle dropdown onChange
  const dropdownChangeHandler = async (productMeta) => {

    let { data } = await MainService.getProductHighlight(application_id, productMeta.product_item_code);
    if (data) {
      setHighlightList(data.product.highlights);
      setCheckboxValue(data.product.enablePriceDrop);
    } else {
      setHighlightList([]);
      setCheckboxValue(false);
    }
    setSelectedDropdownProduct(productMeta);
  }

  // Dropdown data
  const getSearchItems = () => {
    let prepareProductList = []
    productItems.forEach((product) => {
      let searchProduct = {}
      searchProduct.text = product?.name
      searchProduct.sub_text = product?.brand?.name
      searchProduct.value = {
        name: product?.name,
        product_slug: product?.slug,
        image: product?.images[0],
        brand_name: product?.brand?.name,
        category_slug: product?.category_slug,
        product_item_code: product?.uid,
        price: product?.price
      }
      searchProduct.logo = product?.images[0]
      prepareProductList.push(searchProduct);
    })
    return prepareProductList;
  }

  const handleSubmit = async () => {
    if (isEdit) {
      await MainService.createProductHighlights(
        application_id,
        editProduct.product_item_code,
        {
          productMeta: editProduct,
          highlights: highlightList,
          enablePriceDrop: checkboxValue
        }
      )

    } else {
      await MainService.createProductHighlights(
        application_id,
        selectedDropdownProduct.product_item_code,
        {
          product_meta: selectedDropdownProduct,
          highlights: highlightList,
          enablePriceDrop: checkboxValue
        }
      )
    }

    navigate(`/company/${company_id}/${application_id}/product-list/`);
  }

  return (
    <>
      <div className={styles.main_wrapper}>

        {/* NAVBAR */}
        <div className={styles.navbar}>

          {/* NAVBAR LEFT */}
          <div className={styles.navbar_left_header}>
            <div className={styles.back_arrow}>
              <SvgIcArrowBack
                color='#2E31BE'
                style={{
                  width: "24px",
                  height: "auto"
                }}
                onClick={() => {
                  navigate(`/company/${company_id}/${application_id}/product-list/`)
                }}
              />
            </div>
            <div className={styles.main_title}>
              {isEdit ? ("Edit") : ("Create")} Product Highlight
            </div>
          </div>

          {/* NAVBAR RIGHT */}
          <div className={styles.navbar_buttons}>
            {/* DISCARD BUTTON */}
            <div>
              <Button
                state='default'
                theme='secondary'
                // size='small'
                rounded={false}
                onClick={() => {
                  navigate(`/company/${company_id}/${application_id}/product-list/`)
                }}
                >
                Discard
              </Button>
            </div>

            {/* SUBMIT BUTTON */}
            <div>
              <Button
                state='default'
                theme='primary'
                // size='small'
                rounded={false}
                onClick={handleSubmit}
                >
                {isEdit ? ("Save") : ("Submit")}
              </Button>
            </div>
          </div>

        </div>
        {/* END NAVBAR */}

        <div className={styles.content_wrapper}>

          <div className={styles.highlight_detail_box}>
            <div>
              <div className={styles.highlight_detail_box_header}>Product Highlight Detail</div>
            </div>

            {/* PRODUCT DROPDOWN */}
            {!isEdit ? (
              <div className={styles.select_product_dropdown}>
                <Dropdown
                  placeholder="select product"
                  searchable={true}
                  items={getSearchItems()}
                  onChange={(productMeta) => {dropdownChangeHandler(productMeta);}}
                  onSearchInputChange={(e) => {setSearchText(e.text);}}
                />
              </div>
            ) : (
              <div className={styles.edit_product_title}>
                <Input
                  type='text'
                  value={editProduct.name}
                  disabled={true}
                />
              </div>
            )}

            <div className={styles.add_highlights_header}>
              Add/Edit Highlights
            </div>

            {/* HIGHLIGHTS LIST */}
            <div>
              {highlightList?.map((highlight, index) => (
                <div className={styles.highlight_list}>
                  <div>
                    {highlight}
                  </div>

                  <div className={styles.highlight_list_delete}>
                    <SvgIcTrash
                      className={styles.highlight_delete}
                      style={{
                        height: "24px",
                        width: "auto"
                      }}
                      color="#2E31BE"
                      onClick={() => {
                        setHighlightList((prevItem) => {
                          return [...prevItem.slice(0, index), ...prevItem.slice(index+1)]
                        })
                      }}
                    />
                  </div>

                </div>
              ))}
            </div>

            <div className={styles.highlight_input_ok}>
              {/* HIGHLIGHT INPUT */}
              <div className={styles.highlight_input_div}>
                <Input
                  placeholder='add highlights'
                  style={{
                    padding: "0px"
                  }}
                  max={200}
                  min={1}
                  value={highlightInput}
                  disabled={ !isEdit && Object.keys(selectedDropdownProduct).length === 0 ? true : false }
                  onChange={(e) => {setHighlightInput(e.target.value)}}
                  onKeyPress={(e) => {
                    if (e.key === 'Enter') {
                      setHighlightList([...highlightList, highlightInput])
                      setHighlightInput("")
                    }
                  }}
                />
              </div>
              {/* HIGHLIGHT OK BUTTON */}
              <div
                onClick={() => {
                  setHighlightList([...highlightList, highlightInput])
                  setHighlightInput("")
                }}
                >
                {highlightInput && (
                  <SvgIcConfirm
                    color='#2e31be'
                    style={{
                      height: "24px",
                      width: "auto",
                      cursor: "pointer"
                    }}
                  />
                )}
              </div>
            </div>

            {/* ENABLE PRICE DROP CHECKBOX */}
            <div className={styles.enable_price_drop_checkbox}>
              <Checkbox
                labelText="Enable 'Price Drop' label whenever price is reduced in last 2 days"
                disabled={ !isEdit && Object.keys(selectedDropdownProduct).length === 0 ? true : false }
                checkboxValue={checkboxValue}
                onChange={(changedState) => {
                  setCheckboxValue(changedState);
                }}
              />
            </div>

          </div>

          <div className={styles.highlight_preview_box}>
            <div className={styles.preview_box_header}>
              Preview
            </div>
            <div className={styles.horizontal_line}></div>
            <div>
              {highlightList.length>0 && <div className={styles.highlightTitle}>Product Highlights</div>}
              <div>
                {highlightList?.map((highlight) => (
                  <div className={styles.highlightList}>{highlight}</div>
                ))}
              </div>
            </div>
          </div>

        </div>
      </div>
    </>
  )
}
Step 3: Add CSS for the CreateHighlight Component
- In the
/src/views/style/directory, create a new file calledcreateHighlight.module.css. - Add the following code to the file:
@import url('https://fonts.googleapis.com/css2?family=Montserrat:wght@400;700&display=swap');

.main_wrapper {
    font-family: Inter;
    position: relative;
    box-sizing: border-box;
    background: #fff;
    border: 1px solid #f3f3f3;
    border-radius: 12px;
    padding: 24px;
    margin: 24px;
}

.navbar {
    display: flex;
    flex-direction: row;
    align-items: center;
    justify-content: space-between;
}

.navbar_left_header {
    display: flex;
    align-items: center;
}

.main_title {
    font-size: 22px;
    font-weight: 600;
    margin: 0 24px;
    color: #41434c;
}

.back_arrow {
    cursor: pointer;
}

.navbar_buttons {
    display: flex;
    flex-direction: row;
    align-items: center;
}

.navbar_buttons Button {
    margin: 0 16px;
}

/* content wrapper */
.content_wrapper {
    display: flex;
    flex-direction: row;
    gap: 16px;
    margin-top: 16px;
}

/* details box */
.highlight_detail_box {
    flex: 1.5;
    padding: 16px;
}

.highlight_detail_box_header {
    font-size: 16px;
    font-weight: 700;
    color: #41434c;
}

/* DROP DOWN */
.select_product_dropdown {
    margin: 12px 0;
    max-width: 50%;
}

.edit_product_title {
    margin: 12px 0;
    max-width: 50%;
}

.edit_product_title div {
    padding: 0;
    max-height: 64px;
}

.edit_product_title input {
    padding: 6px 24px;
}

.add_highlights_header {
    font-size: 16px;
    font-weight: 400;
    line-height: 140%;
    margin-top: 24px;
    color: rgba(102, 102, 102, 0.5);
}

/* HIGHLIGHT LIST */
.highlight_list {
    display: flex;
    flex-direction: row;
    padding: 8px 16px;
    align-items: center;
    justify-content: space-between;
    gap: 12px;

    font-weight: 400;
    line-height: 140%;
    color: #4f4f4f;
    font-size: 14px;
}

.highlight_list_delete {
    padding: 0 4px;
    cursor: pointer;
}

/* HIGHLIGHT INPUT */
.highlight_input_ok {
    margin: 12px 0;
    display: flex;
    flex-direction: row;
    align-items: center;
    gap: 24px;
}

.highlight_input_div {
    min-width: 360px;
    max-width: 512px;
    width: -webkit-fill-available;
}

.highlight_input_div input {
    font-size: 16px;
    padding: 0px 16px;
}

.highlight_input_div input::placeholder {
    font-size: 16px;
}

/* preview box */
.highlight_preview_box {
    margin-top: 12px;
    padding: 16px;
    flex: 1;
    border: 1px solid #e4e5e6;
    border-radius: 4px;
}

.preview_box_header {
    font-size: 16px;
    font-weight: 700;
    color: #41434c;
}

.horizontal_line {
    border: 1px solid #ccc;
}

.highlightTitle {
    font-size: 18px;
    font-weight: 700;
    color: #000;
    padding: 16px 0 0 0;
    font-family: 'Montserrat', sans-serif;
}

.highlightList {
    font-size: 16px;
    font-weight: 400;
    color: #000;
    padding: 10px 0;
    font-family: 'Montserrat', sans-serif;
}

.enable_price_drop_checkbox {
    margin: 24px 0px;
}

.enable_price_drop_checkbox label {
    justify-content: flex-start;
}
Step 4: Create Route for the CreateHighlight Component
-
Add the following objects to the
CreateBrowserRouterlist in/src/router/index.jsfile:{
path: "/company/:company_id/:application_id/highlight/create",
element: <CreateHighlight />
},
{
path: "/company/:company_id/:application_id/highlight/:item_code",
element: <CreateHighlight />
} -
Import
ProductListcomponent at the top of/src/router/index.jsfile.import CreateHighlight from "../views/CreateHighlight";noteWe are using the same component
CreateHighlightfor creating new product highlights and updating existing product highlights.
Step 5: Restart the Extension Server and Refresh Extension Page in Development Account
-
Clicking on this arrow button redirect the user to the CreateHighlight page.
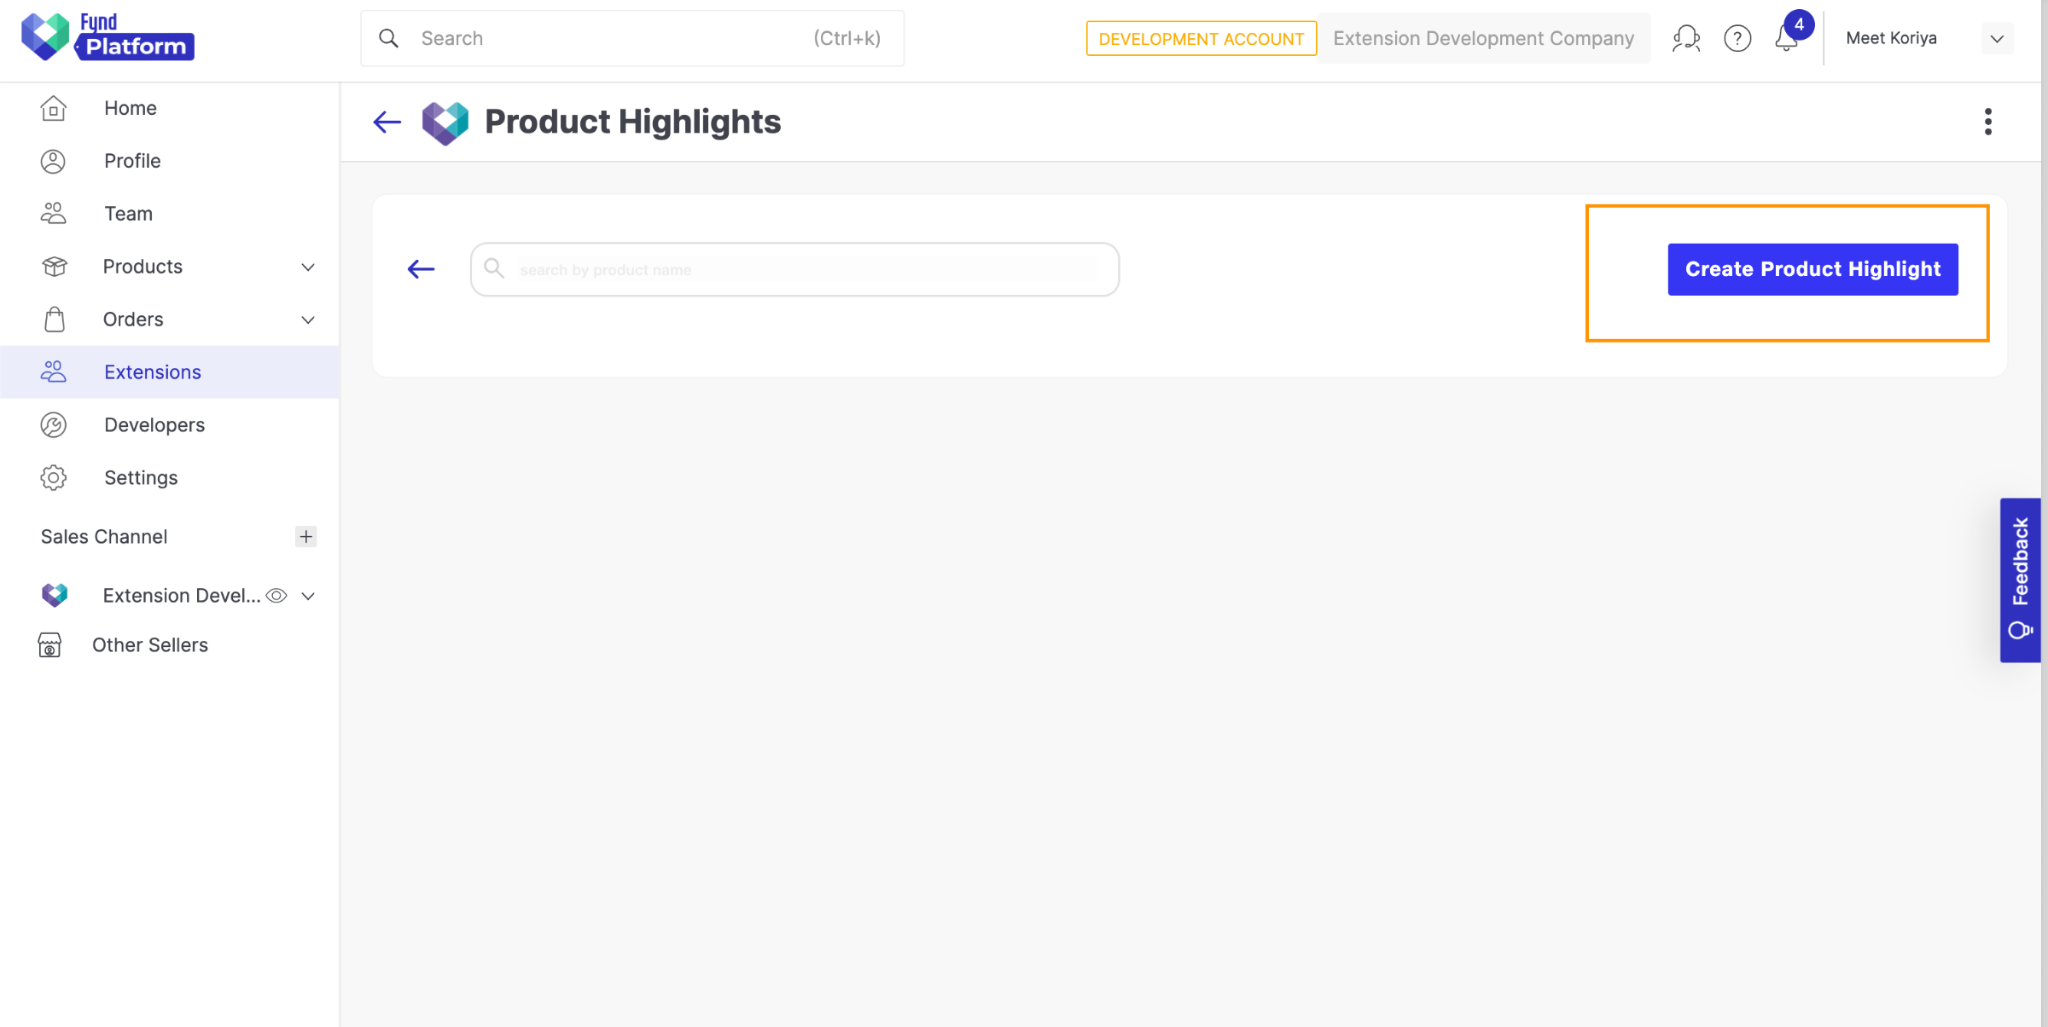
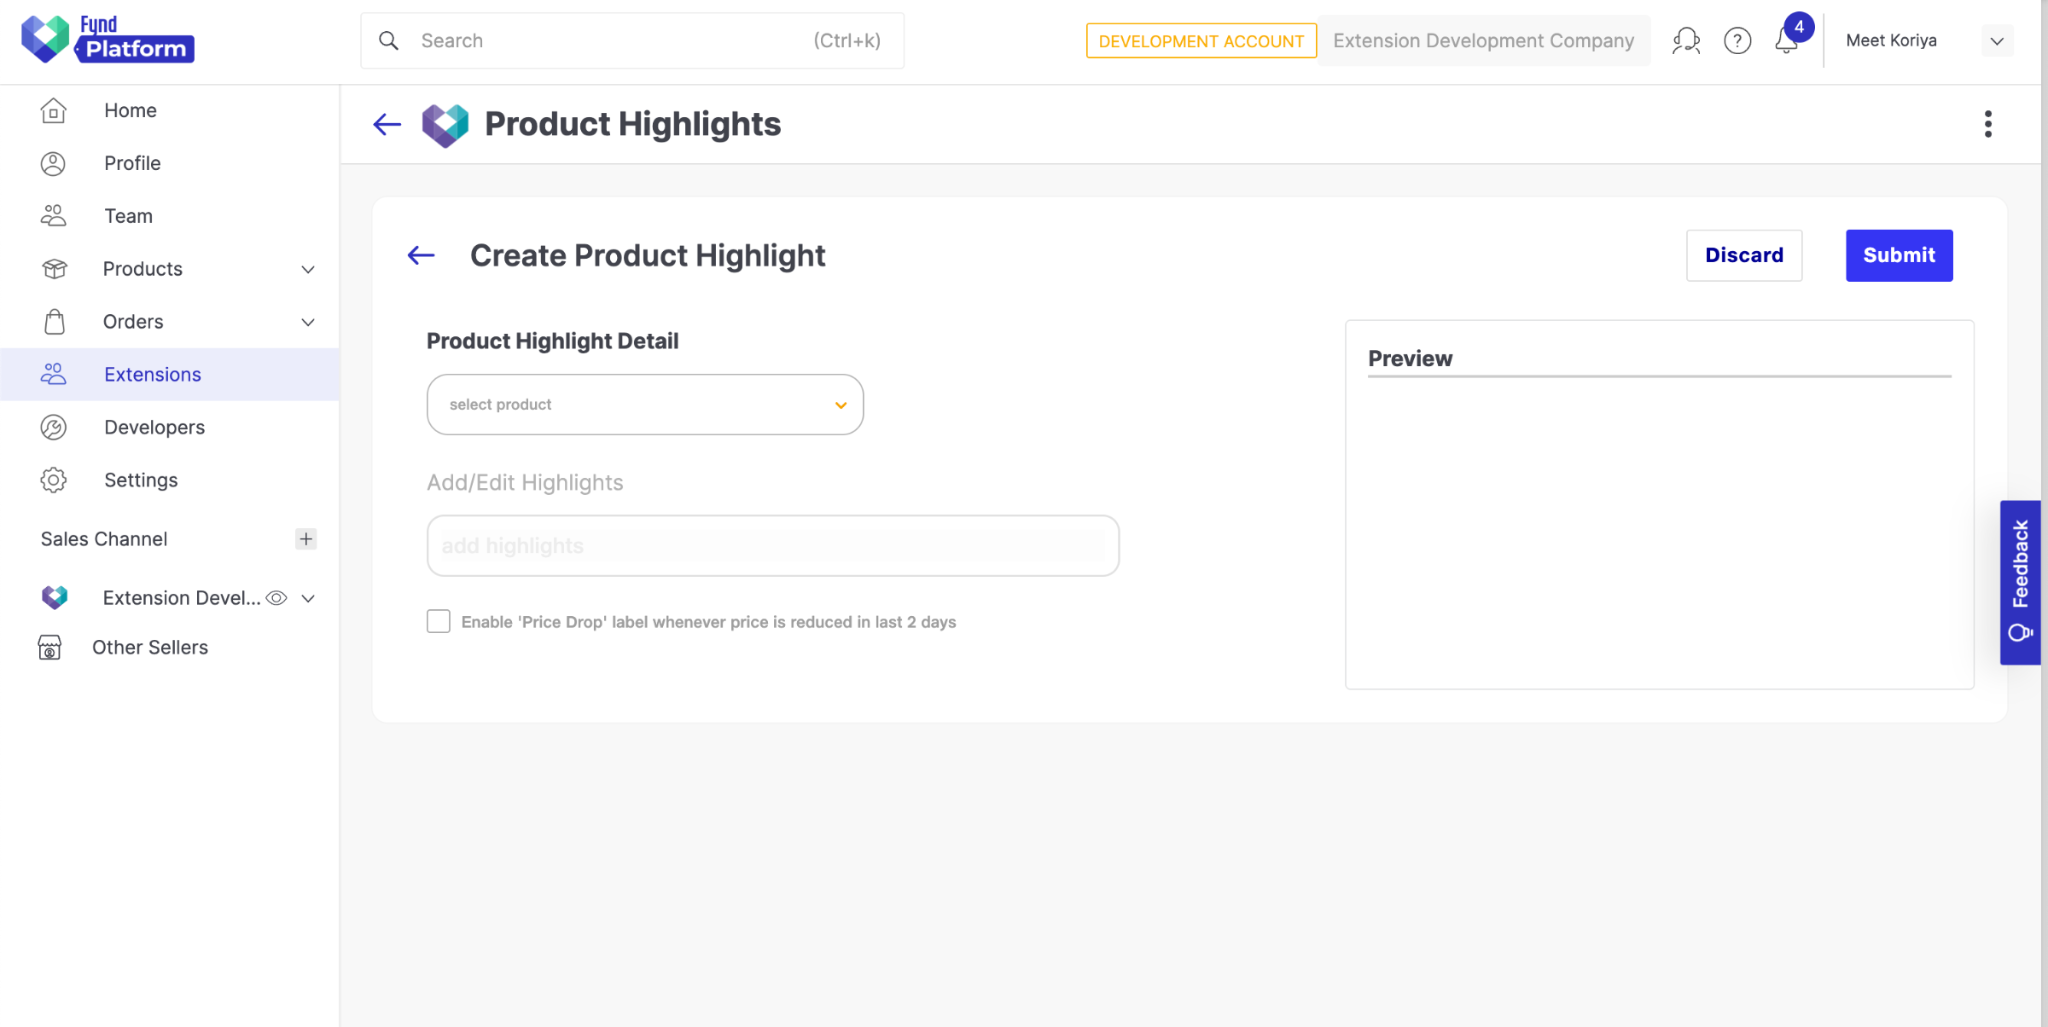
Now, you can create Highlights for products by following the below steps:
- Select any product from the dropdown.
- Add highlights using an input text box.
- After adding all the highlights click on Submit.
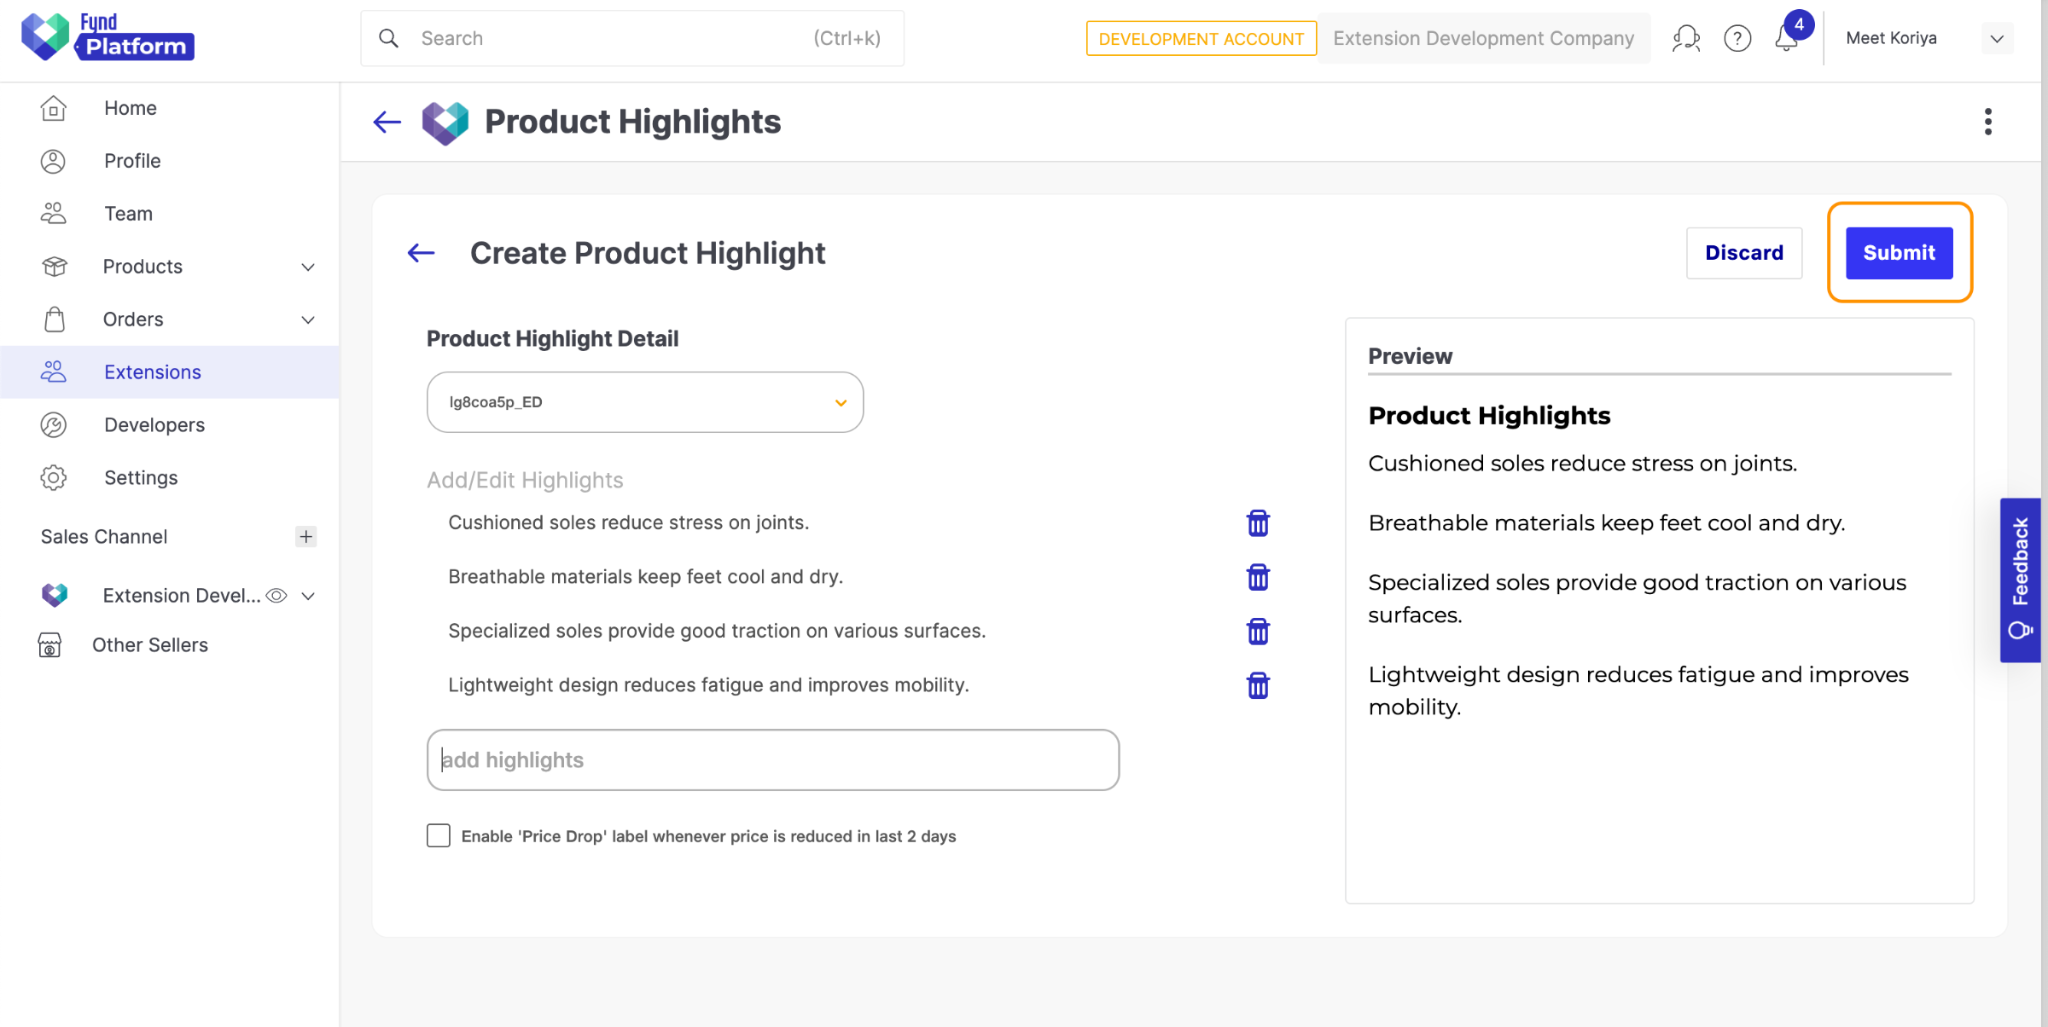
It’ll redirect to the ProductList page.
We’ve completed the UI flow of the Extension. Now in the next step, we will add functionality to show highlights on the Product description page of the store website.
Injecting Javascript into the Storefront Theme
We’ll need to inject Javascript into the theme to show the product highlights and price drop labels. The Fynd Commerce Theme engine is built with Vue2, so we will have to create an Injectable script in Vue itself.
Fynd Commerce now supports React themes as well. For more information on theme development, please refer to the documentation.
Step 1: Create Binding in Extension
- Go to Fynd Partners.
- Click Manage and select your organization.
- In the left pane, click Extensions.
- Select your Extension.
- In the upper-right side of the window, click on three dots and then select Bindings.
- Click Add Template and fill in the required details.
- Repeat Step 6 for the Price Drop Tag.
Now, in the next step, we’ll create Vue components and inject them using these bindings.
Step 2: Setup Vue Project
- Run the following command in your terminal to install Vue-CLI npm package:
npm i -g @vue/cli
- Run the following command to create new directory
bindinginside your project root directory:
mkdir bindings
cd bindings
- Run the following command to create Vue project:
vue create .
Choose Yes for the prompt “Generate project in the current directory?” and select Vue2 for the prompt “Please pick a preset:”
- Open
/bindings/vue.config.jsfile and replace the code with the following code:
module.exports = {
  pages: {
    index: {
      // entry for the page
      entry: process.env.NODE_ENV == "development" ? 'src/dev.js' : 'src/main.js'
    },
  },
  devServer: {
    disableHostCheck: true
  }
}
- Run the following command to install
axiosandurl-joinpackage inside/bindings/directory:
npm i axios
npm i url-join
- In the
/binding/directory, open the/package.jsonfile and replace the following line:
"build": "vue-cli-service build",
with
"build": "vue-cli-service build --target lib src/main.js --name product-highlights",
-
Delete unnecessary files such as
README.mdandjsconfig.jsonfiles from the/bindings/directory. -
Delete all the files and folders from the
/bindings/srcdirectory. -
In the
/bindings/src/directory, create a new file calleddev.jsand add the following code to the file:
import App from './App.vue';
import Vue from 'vue';

new Vue({
  render: h => h(App)
}).$mount('#app')
- In the
/bindings/src/directory, create a new file calledmain.jsand add the following code to the file:
import Highlights from './Highlights.vue'
import PriceDrop from './PriceDrop.vue'

window.FPI.extension.register("#product-highlights", {
  mounted(element) {
    window.FPI.extension.mountApp({
      element,
      component: Highlights
    });
  }
})

window.FPI.extension.register("#product-price-drop", {
  mounted(element) {
    window.FPI.extension.mountApp({
      element,
      component: PriceDrop
    })
  }
})
Step 3: Create Vue Components
- In the
/bindings/src/directory, create a new file calledHighlights.vueand add the following code to the file:
<template>
  <div class="product-highlights">
    <div v-if="highlightsData">
      <div class="highlightTitle">Product Highlights</div>
      <div
        v-for="(highlight, index) in highlightsData"
        :key="index"
        >
        <div class="highlightList">{{highlight}}</div>
      </div>
    </div>
  </div>
</template>

<script>
import axios from 'axios';
import urlJoin from "url-join";

export default {
  name: "ProductHighlights",

  data() {
    return {
      highlightsData: null
    };
  },

  async mounted() {
    const baseURL = window.location.origin;
    const product_slug = this.$route.params.slug;


    let { data } = await axios.get(
      urlJoin(baseURL, 'ext/producthighlights/highlight'),
      { params: {slug: product_slug} }
    );

    if (data && data.is_active && data.product && data.product.highlights && data.product.highlights.length) {
      this.highlightsData = data.product.highlights
    }
  },
}
</script>

<style>
.highlightTitle {
  font-size: 14px;
  font-weight: 700;
  color: #000000;
  padding: 32px 0 6px 0;
}

.highlightList {
  font-size: 14px;
  font-weight: 400;
  color: #000000;
  padding: 8px 0;
}
</style>
-
Download
drop-price-tag.svgfile from GitHub and add it into the/bindings/assets/directory. Here is the link to SVG : Click Here -
In the
/bindings/src/directory, create a new file calledPriceDrop.vueand add the following code to the file:
<template>
  <div>
    <div v-if="showPriceDrop">
      <img src="../assets/drop-price-tag.svg" alt="price-drop-png" />
    </div>
  </div>
</template>

<script>
import axios from "axios";
import urlJoin from "url-join";
export default {
  name: 'PriceDrop',

  data() {
    return {
      showPriceDrop: false
    }
  },

  async mounted() {
    const baseURL = window.location.origin;
    const product_slug = this.$route.params.slug;

    let { data } = await axios.get(
      urlJoin(baseURL, 'ext/producthighlights/price-drop'),
      { params: {slug: product_slug} }
    );

    if (data && data.showPriceDrop) {
      this.showPriceDrop = true;
    }
  }

}
</script>

<style scoped>
img {
  height: 48px;
  width: auto;
}
</style>
- Build the project using the following command inside
/bindings/directory:
npm run build
Step 4: Write Logic for Script Injection
-
In the
/app/directory, open the/server.jsfile and replace following line:app.use(express.static(path.resolve(__dirname, "../build/")));with
app.use(express.static(path.resolve(__dirname, "../build/")));
app.use('/bindings/product-highlights', express.static(path.join(__dirname, '../bindings/dist')))
With these, we are serving min.js files that we created by building the bindings bundle. Now, these min.js files can be accessed using the Extension base URL.
-
To maintain the Proxy record, we will create one MongoDB schema. For that open the
/app/db/mongo.jsfile and add the following code:const ProxySchema = new mongoose.Schema({
company_id: {
type: String,
required: true
},
application_id: {
type: String,
required: true
},
attached_path: {
type: String
},
proxy_url:{
type: String
},
})
const ProxyRecord = mongoose.model("Proxy", ProxySchema); -
Export newly created
ProxyRecordat end of the file:module.exports = { ProductHighlightRecord, ProxyRecord } -
To add a proxy, we’ll require a unique string, which will be passed as a parameter to the
addProxyPathmethod. -
Add the following line at the end of
.envfile at project directory:PROXY_ATTACH_PATH="producthighlights" -
Add
proxy_attach_pathto/app/config.jsfile.proxy_attach_path: {
doc: "Proxy attach path",
default: '',
env: "PROXY_ATTACH_PATH"
}, -
In the
/app/routes/directory, create a new file calledscript.router.jsand add the following code to the file:const express = require('express');
const router = express.Router();
const config = require('../config');
const { ProductHighlightRecord, ProxyRecord } = require('../db/mongo')
function getTagSchema(application_id) {
return [
{
"name": "Product Highlights injection script",
"sub_type": "external",
"type": "js",
"position": "body-bottom",
"url": `${config.extension.base_url}/bindings/product-highlights/product-highlights.umd.js`,
"attributes": {
"id": application_id
}
},
{
"name": "Product Highlights injection css",
"sub_type": "external",
"type": "css",
"position": "head",
"url": `${config.extension.base_url}/bindings/product-highlights/product-highlights.css`,
"attributes": {
}
}
]
}
router.post("/:application_id/tag/:item_code", async function view(req, res, next) {
try {
const { platformClient } = req;
const { application_id, item_code } = req.params;
const companyId = Number(req.fdkSession.company_id);
let response;
let data = await ProductHighlightRecord.findOne({
application_id: application_id, company_id: companyId, product_item_code: item_code
}).exec()
if (data) {
data.is_active = true;
await data.save();
// add proxy
let proxyCount = await ProxyRecord.find({company_id: companyId, application_id: application_id}).count();
if (proxyCount < 1) {
await platformClient.application(application_id).partner.addProxyPath({
extensionId: config.extension.api_key,
body: {
attached_path: config.proxy_attach_path,
proxy_url: `${config.extension.base_url}/app/proxy`
}
})
let prepareProxy = {
company_id: companyId,
application_id: application_id,
attached_path: config.proxy_attach_path,
proxy_url: `${config.extension.base_url}/app/proxy`
}
await new ProxyRecord(prepareProxy).save();
}
response = await platformClient.application(application_id).content.addInjectableTag({
body: {tags: getTagSchema(application_id)}
})
} else {
throw new Error(`Invalid item code: ${item_code}`)
}
return res.status(200).json(response);
} catch(err) {
next(err);
}
})
router.delete("/:application_id/tag/:item_code", async function view(req, res, next) {
try {
const { platformClient } = req;
const { application_id, item_code } = req.params;
const companyId = Number(req.fdkSession.company_id);
let data = await ProductHighlightRecord.findOne({
application_id: application_id, company_id: companyId, product_item_code: item_code
}).exec()
if (data) {
data.is_active = false;
await data.save();
let activeCount = await ProductHighlightRecord.find({
application_id: application_id, company_id: companyId, is_active: true
}).count();
if (activeCount < 1) {
let proxy = await ProxyRecord.deleteOne({company_id: companyId, application_id: application_id}).exec();
if (proxy) {
await platformClient.application(application_id).partner.removeProxyPath({
extensionId: config.extension.api_key, attachedPath: config.proxy_attach_path
})
}
await platformClient.application(application_id).content.deleteAllInjectableTags();
}
} else {
return res.status(400).json({"Error": `Invalid item code: ${item_code}`});
}
return res.status(204).json({"data": "success"});
} catch(err) {
next(err);
}
})
module.exports = router;In this
script.router.jsfile we have created APIs which will be called when activating or deactivating toggle button on the product list page.This APIs will create and destroy the proxy by calling to
addProxyPathandremoveProxyPathmethods of the platformClient respectively.We will use this proxy to call our Extension endpoints from the store front website which will prevent the CORS error thrown by the browser.
tipFor API documentation on addProxyPath and removeProxyPath , please refer to these links.
tipTo learn more about how proxy URLs work, visit this link.
-
Add the following endpoints to the
Endpointsobject in/src/service/endpoint.service.jsfile:INJECTABLE_TAG(application_id, item_code) {
return urlJoin(envVars.EXAMPLE_MAIN_URL, `api/v1.0/${application_id}/tag/${item_code}`);
} -
Add the following methods to the
MainServiceobject in/src/service/main-service.jsfile:// script inject
addInjectableTag(application_id, item_code) {
return axios.post(URLS.INJECTABLE_TAG(application_id, item_code));
},
deleteInjectableTag(application_id, item_code) {
return axios.delete(URLS.INJECTABLE_TAG(application_id, item_code));
}
Now we’ll develop APIs for the application. Both the following APIs will be called from the Product Description Page of the store front. One of the API will return the highlights of the product and the other one will return the boolean value on whether to show Price Drop tag or not.
Before that we will need one MongoDB schema to store the data about whether product’s price has dropped in last 2 days or not.
-
Open
/app/db/mongo.jsfile and add the following codeconst PriceDropSchema = new mongoose.Schema({
product_slug: {
type: String,
require: true,
index: true,
unique: true
},
updatedAt: {
type: Date,
default: Date.now
}
})
PriceDropSchema.pre('save', function(next) {
let now = Date.now();
this.updatedAt = now;
next();
})
PriceDropSchema.path('updatedAt').index({expires: 172800}) // 172800 seconds == 2 days
const PriceDropRecord = mongoose.model("PriceDrop", PriceDropSchema); -
Add also export newley created
PriceDropSchemaat end of filemodule.exports = { ProductHighlightRecord, ProxyRecord, PriceDropRecord } -
In the
/app/routes/directory, create a new file calledapp.router.jsand add the following code to the file:const express = require('express');
const { ProductHighlightRecord, PriceDropRecord } = require('../db/mongo');
const router = express.Router();
router.get("/highlight", async function view(req, res, next) {
try {
const application_id = req.application._id;
const { slug } = req.query;
let data = await ProductHighlightRecord.findOne({
application_id: application_id, product_slug: slug
})
if (data) {
return res.status(200).json(data);
} else {
return res.status(404).json({message: "Not found!"});
}
} catch(err) {
next(err)
}
})
router.get("/price-drop", async function view(req, res, next) {
try {
const application_id = req.application._id;
const { slug } = req.query;
let data = await PriceDropRecord.find({product_slug: slug}).exec();
if (data) {
let productData = await ProductHighlightRecord.findOne({
application_id: application_id, product_slug: slug
})
if (productData.is_active) {
return res.status(200).json({showPriceDrop: productData.product.enablePriceDrop});
} else {
return res.status(200).json({showPriceDrop: false});
}
} else {
return res.status(200).json({showPriceDrop: false});
}
} catch(err) {
next(err);
}
})
module.exports = router; -
Open
/app/server.jsfile and replace with following code:const express = require('express');
const cookieParser = require('cookie-parser');
const bodyParser = require('body-parser');
const path = require("path");
const healthzRouter = require("./routes/healthz.router");
const productRouter = require("./routes/product.router");
const scriptRouter = require("./routes/script.router");
const appRouter = require("./routes/app.router");
const fdkExtension = require("./fdk");
const app = express();
const config = require("./config");
app.use(cookieParser("ext.session"));
app.use(bodyParser.json({
limit: '2mb'
}));
app.get('/env.js', (req, res) => {
const commonEnvs = {
base_url: config.extension.base_url
}
res.type('application/javascript');
res.send(
`window.env = ${JSON.stringify(
commonEnvs,
null,
4
)}`
);
});
app.use("/", healthzRouter);
app.use(express.static(path.resolve(__dirname, "../build/")));
app.use('/bindings/product-highlights', express.static(path.join(__dirname, '../bindings/dist')))
app.use("/", fdkExtension.fdkHandler);
// platform routes
const apiRoutes = fdkExtension.apiRoutes;
apiRoutes.use('/v1.0', productRouter);
apiRoutes.use('/v1.0', scriptRouter);
app.use('/api', apiRoutes);
// application routes
const applicationProxyRoutes = fdkExtension.applicationProxyRoutes
applicationProxyRoutes.use("/proxy", appRouter);
app.use('/app', applicationProxyRoutes);
app.get('/company/:company_id', (req, res) => {
res.sendFile(path.resolve(__dirname, "../build/index.html"))
})
app.get('*', (req, res) => {
res.contentType('text/html');
res.sendFile(path.resolve(__dirname, '../build/index.html'))
});
// webhook handler
app.post('/ext/product-highlight-webhook', async function(req, res) {
try {
console.log("1");
await fdkExtension.webhookRegistry.processWebhook(req);
return res.status(200).json({"success": true});
} catch(err) {
console.log(2);
return res.status(500).json({"success": false});
}
})
module.exports = app;
Step 5: Restart the Extension Server and Refresh Extension Page in Development Account
When the tunnel is restarted, the extension's local development base URL also changes. Consequently, any existing proxy for a sales channel won't function properly. It's advisable to remove the old proxy associated with the previous tunnel URL and add the new tunnel URL as a proxy.
The simplest approach is to uninstall the extension from the development company and then reinstall it.
As shown in the below image, when clicking on the Toggle button, an API call is made to the Extension backend, which injects the script into the storefront theme.
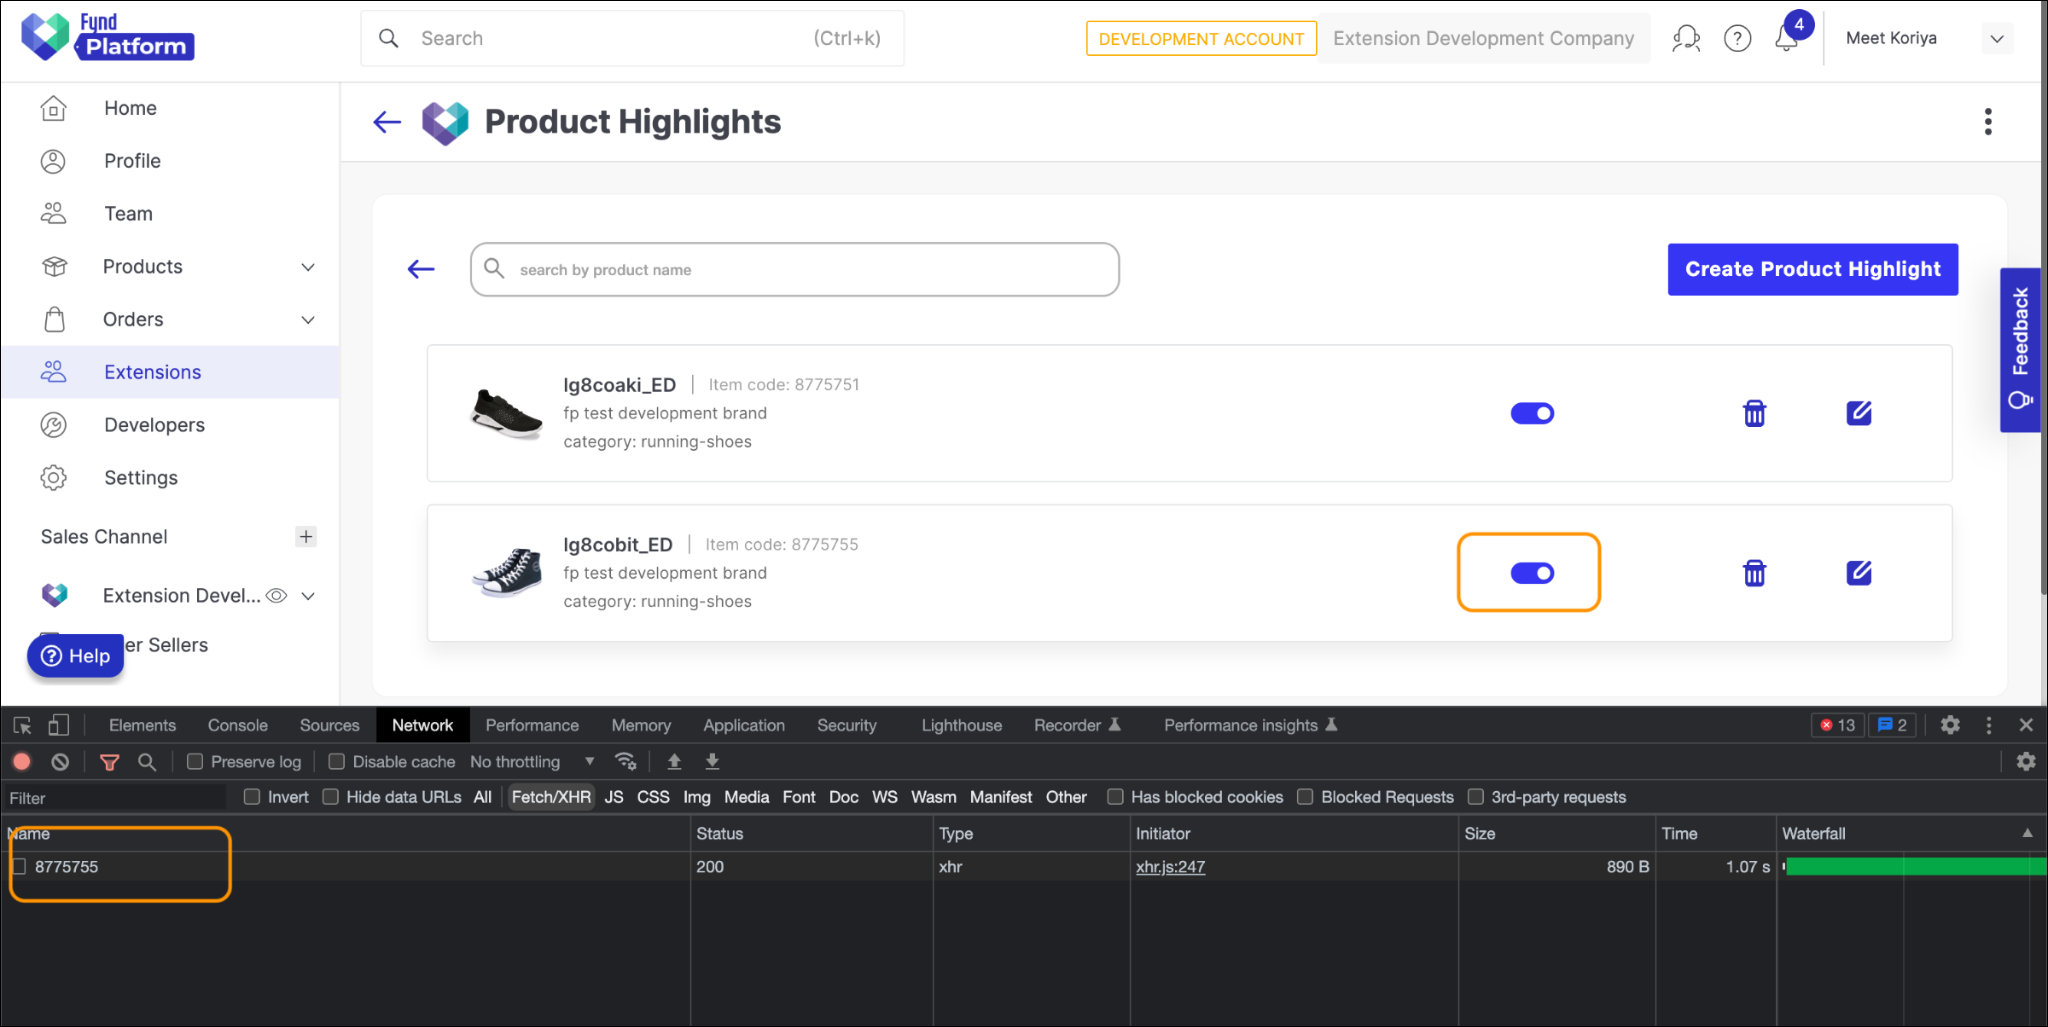
But highlights won’t be visible on the product description page of the product for which we have activated highlights. To show the highlights user will have to configure extension binding in their theme.
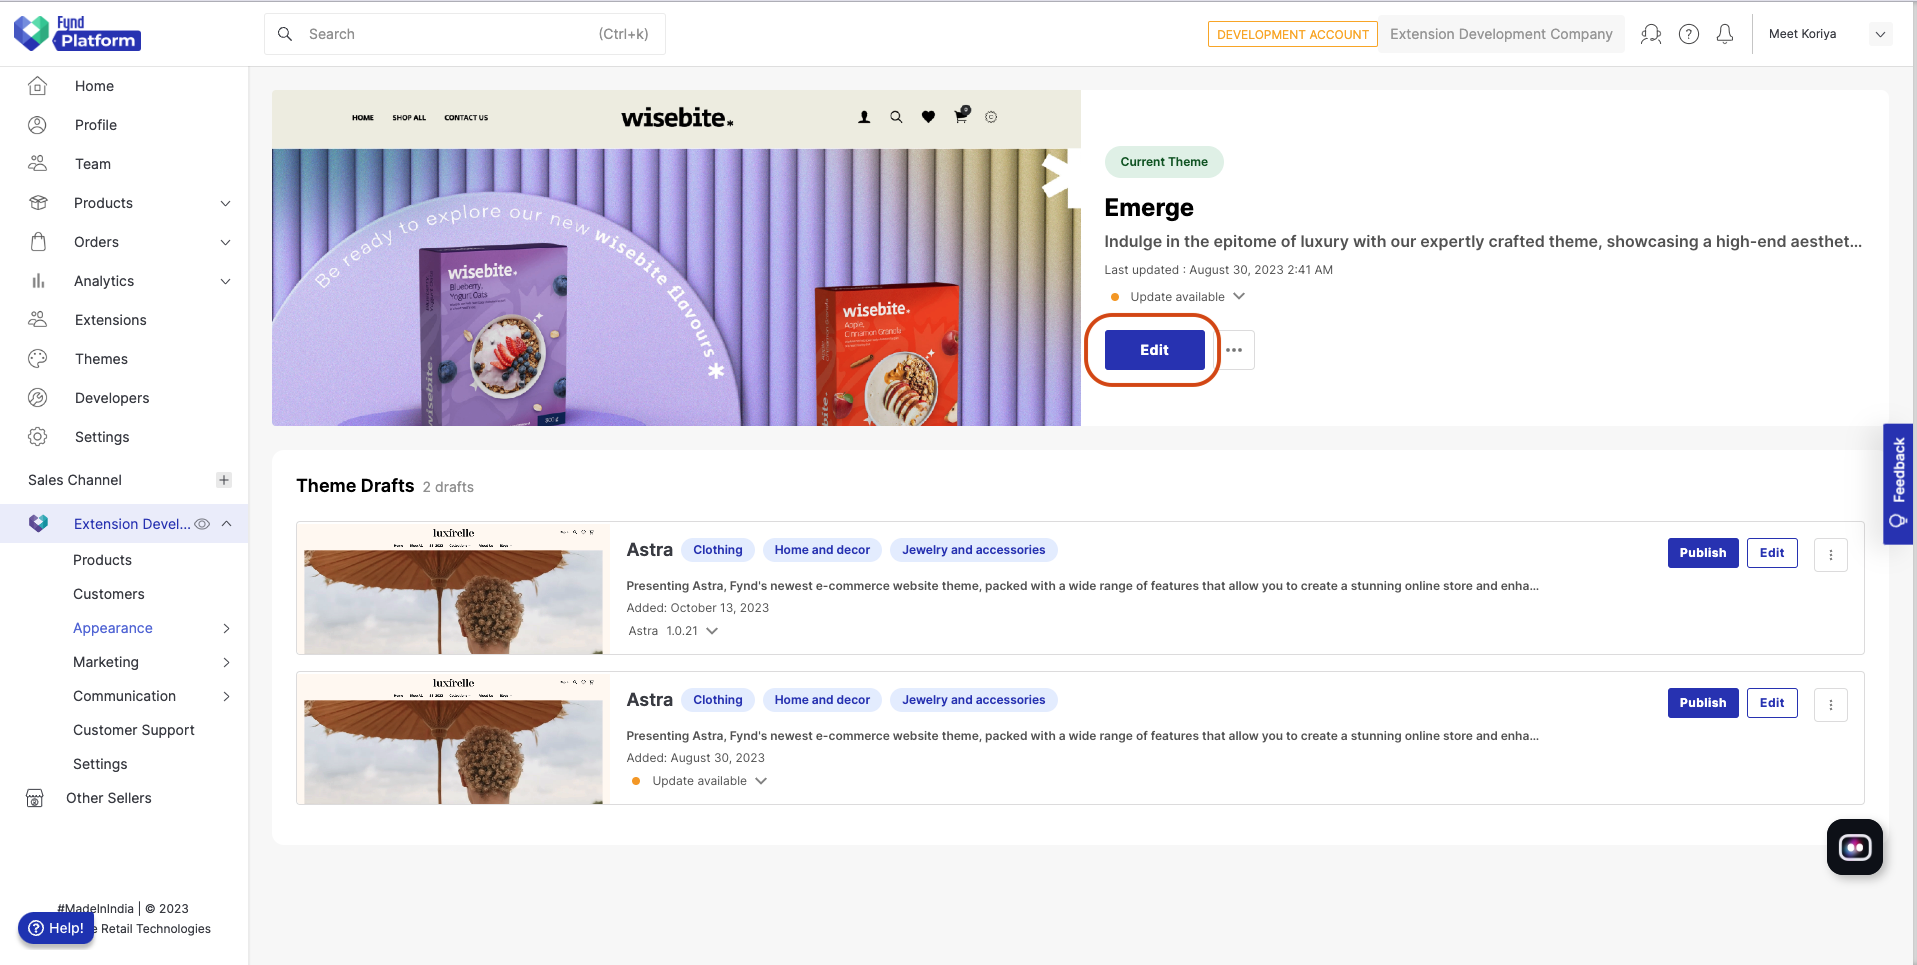
- Visit Fynd Commerce.
- In the left pane, select the sales channel.
- Go to Appearance > Themes.
- Click Edit to edit the current active theme.
-
Select Product Description from top menu and select any product.
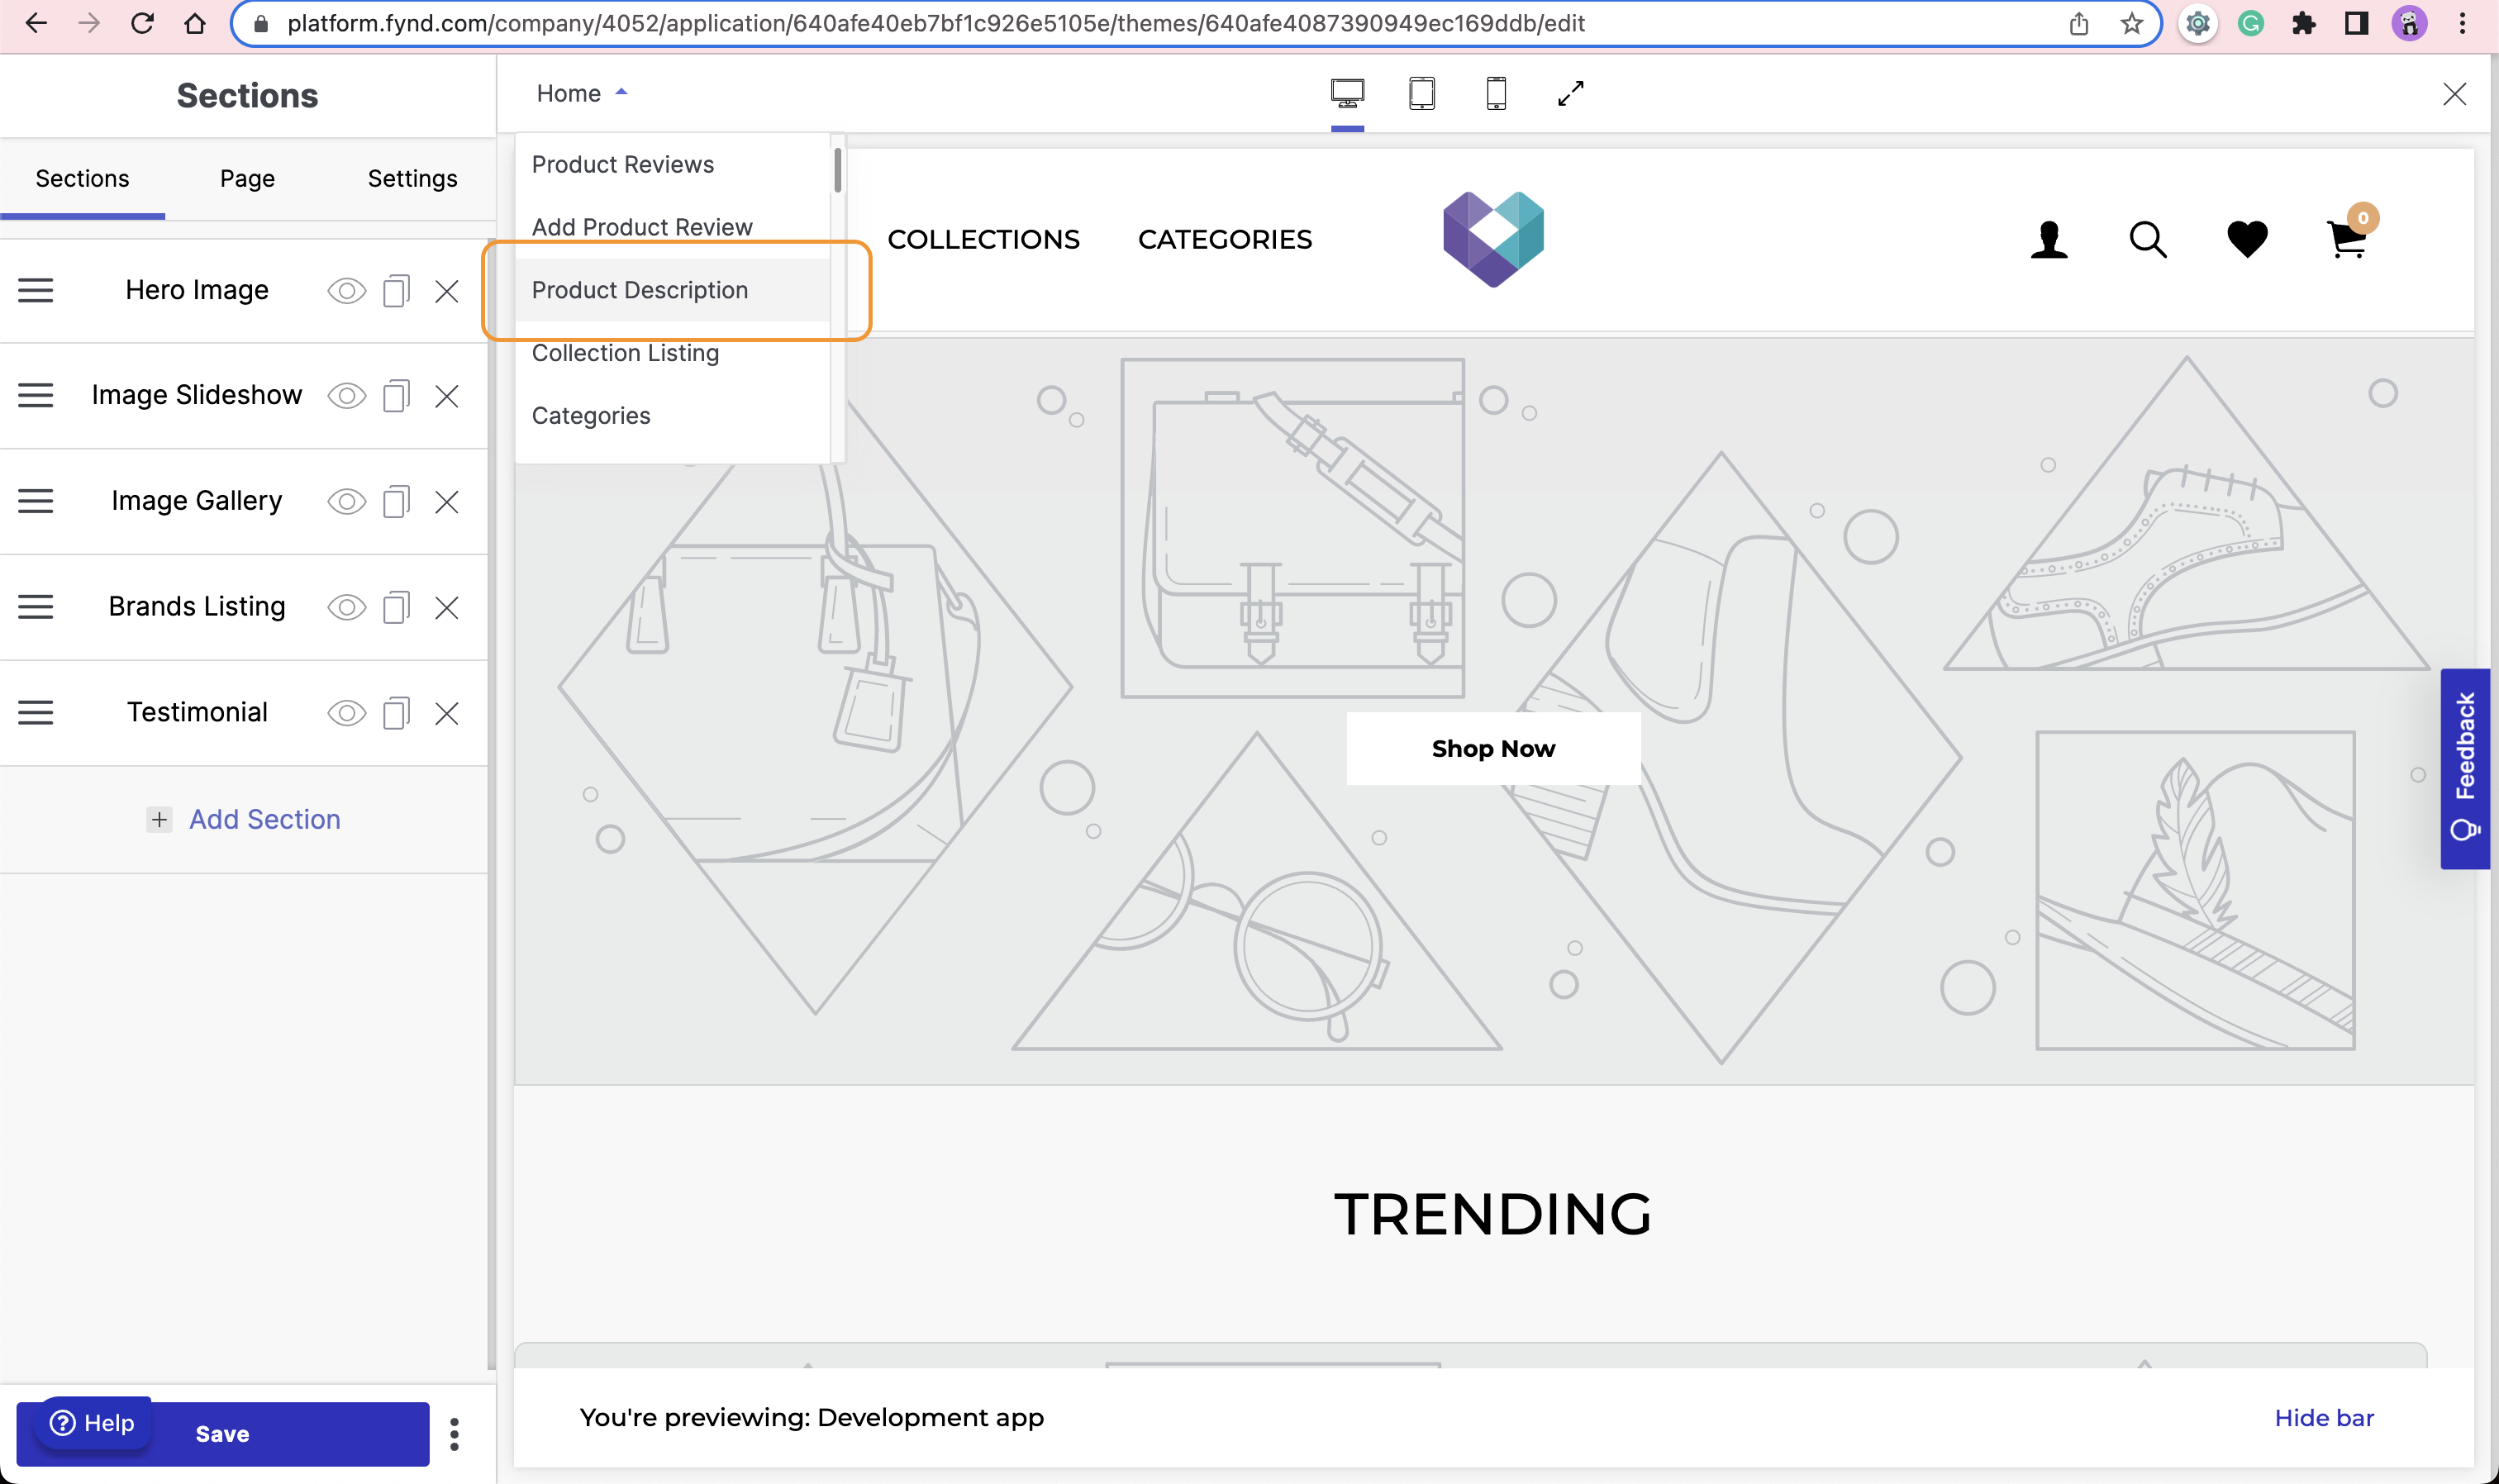
-
Select Page tab of Sections and Scroll down for Extension Positions
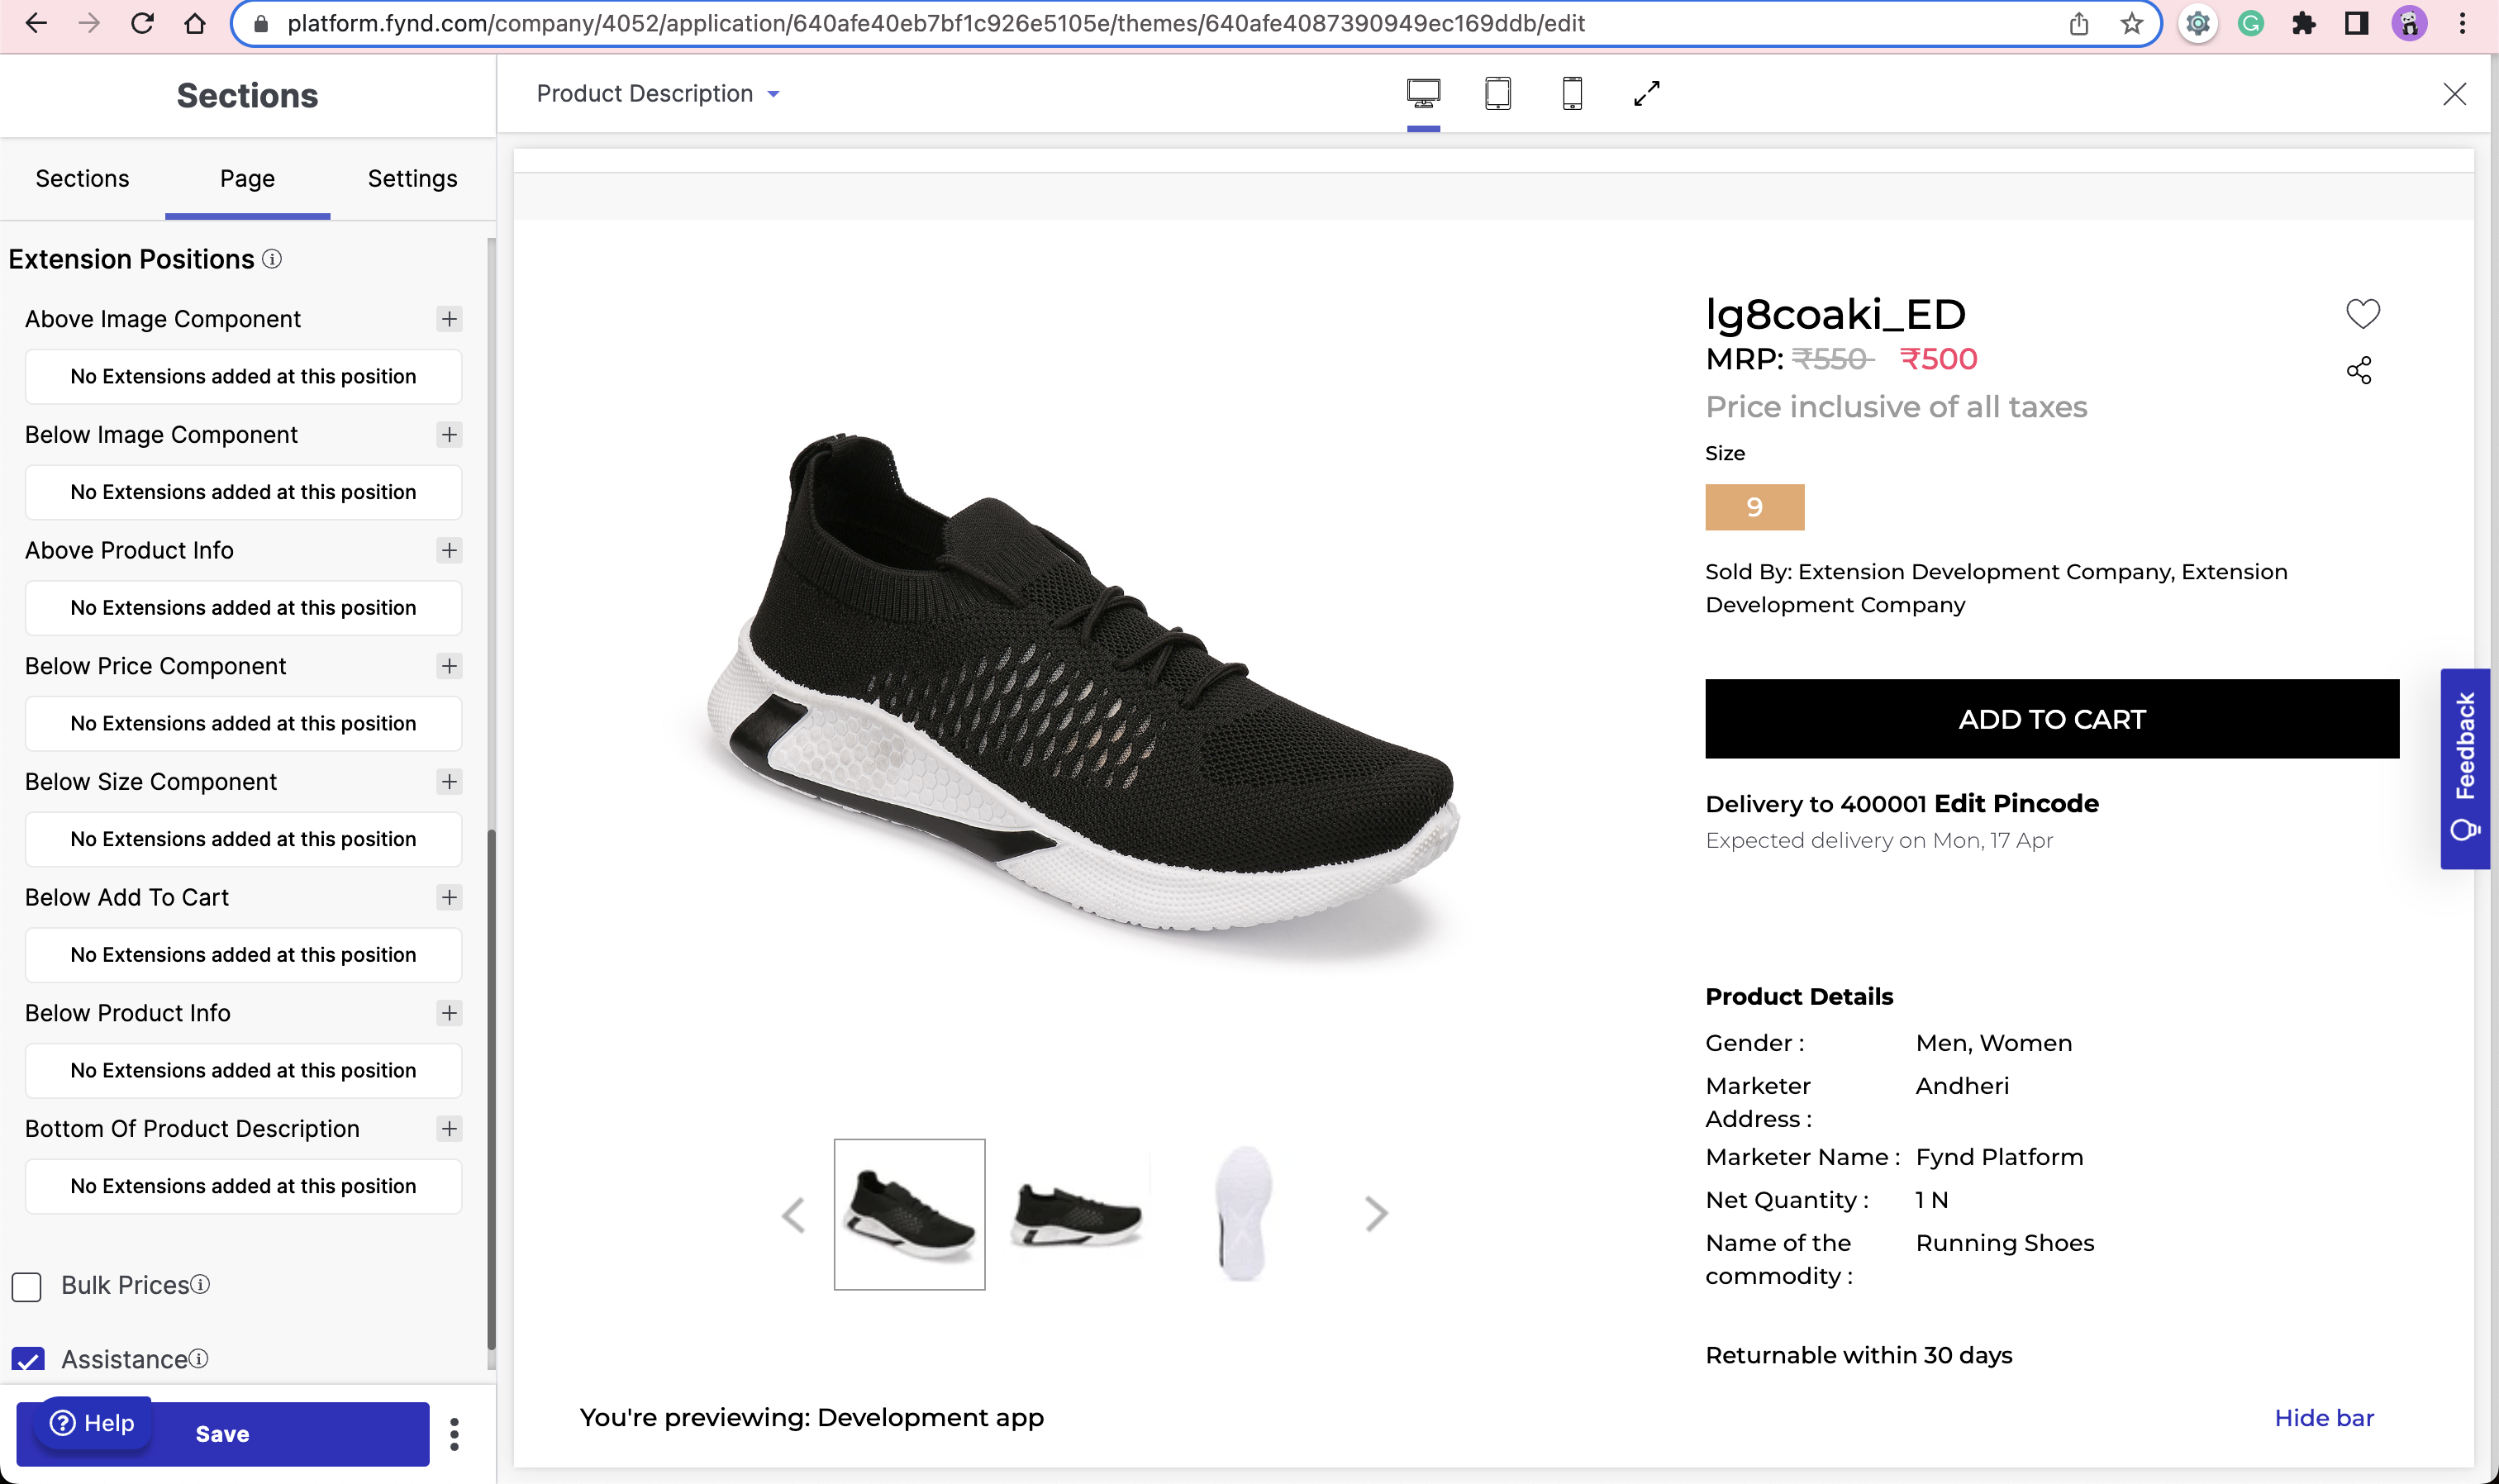
-
Add Product Highlight Extension at Below Price Component position and Below Product Info position as shown in below image
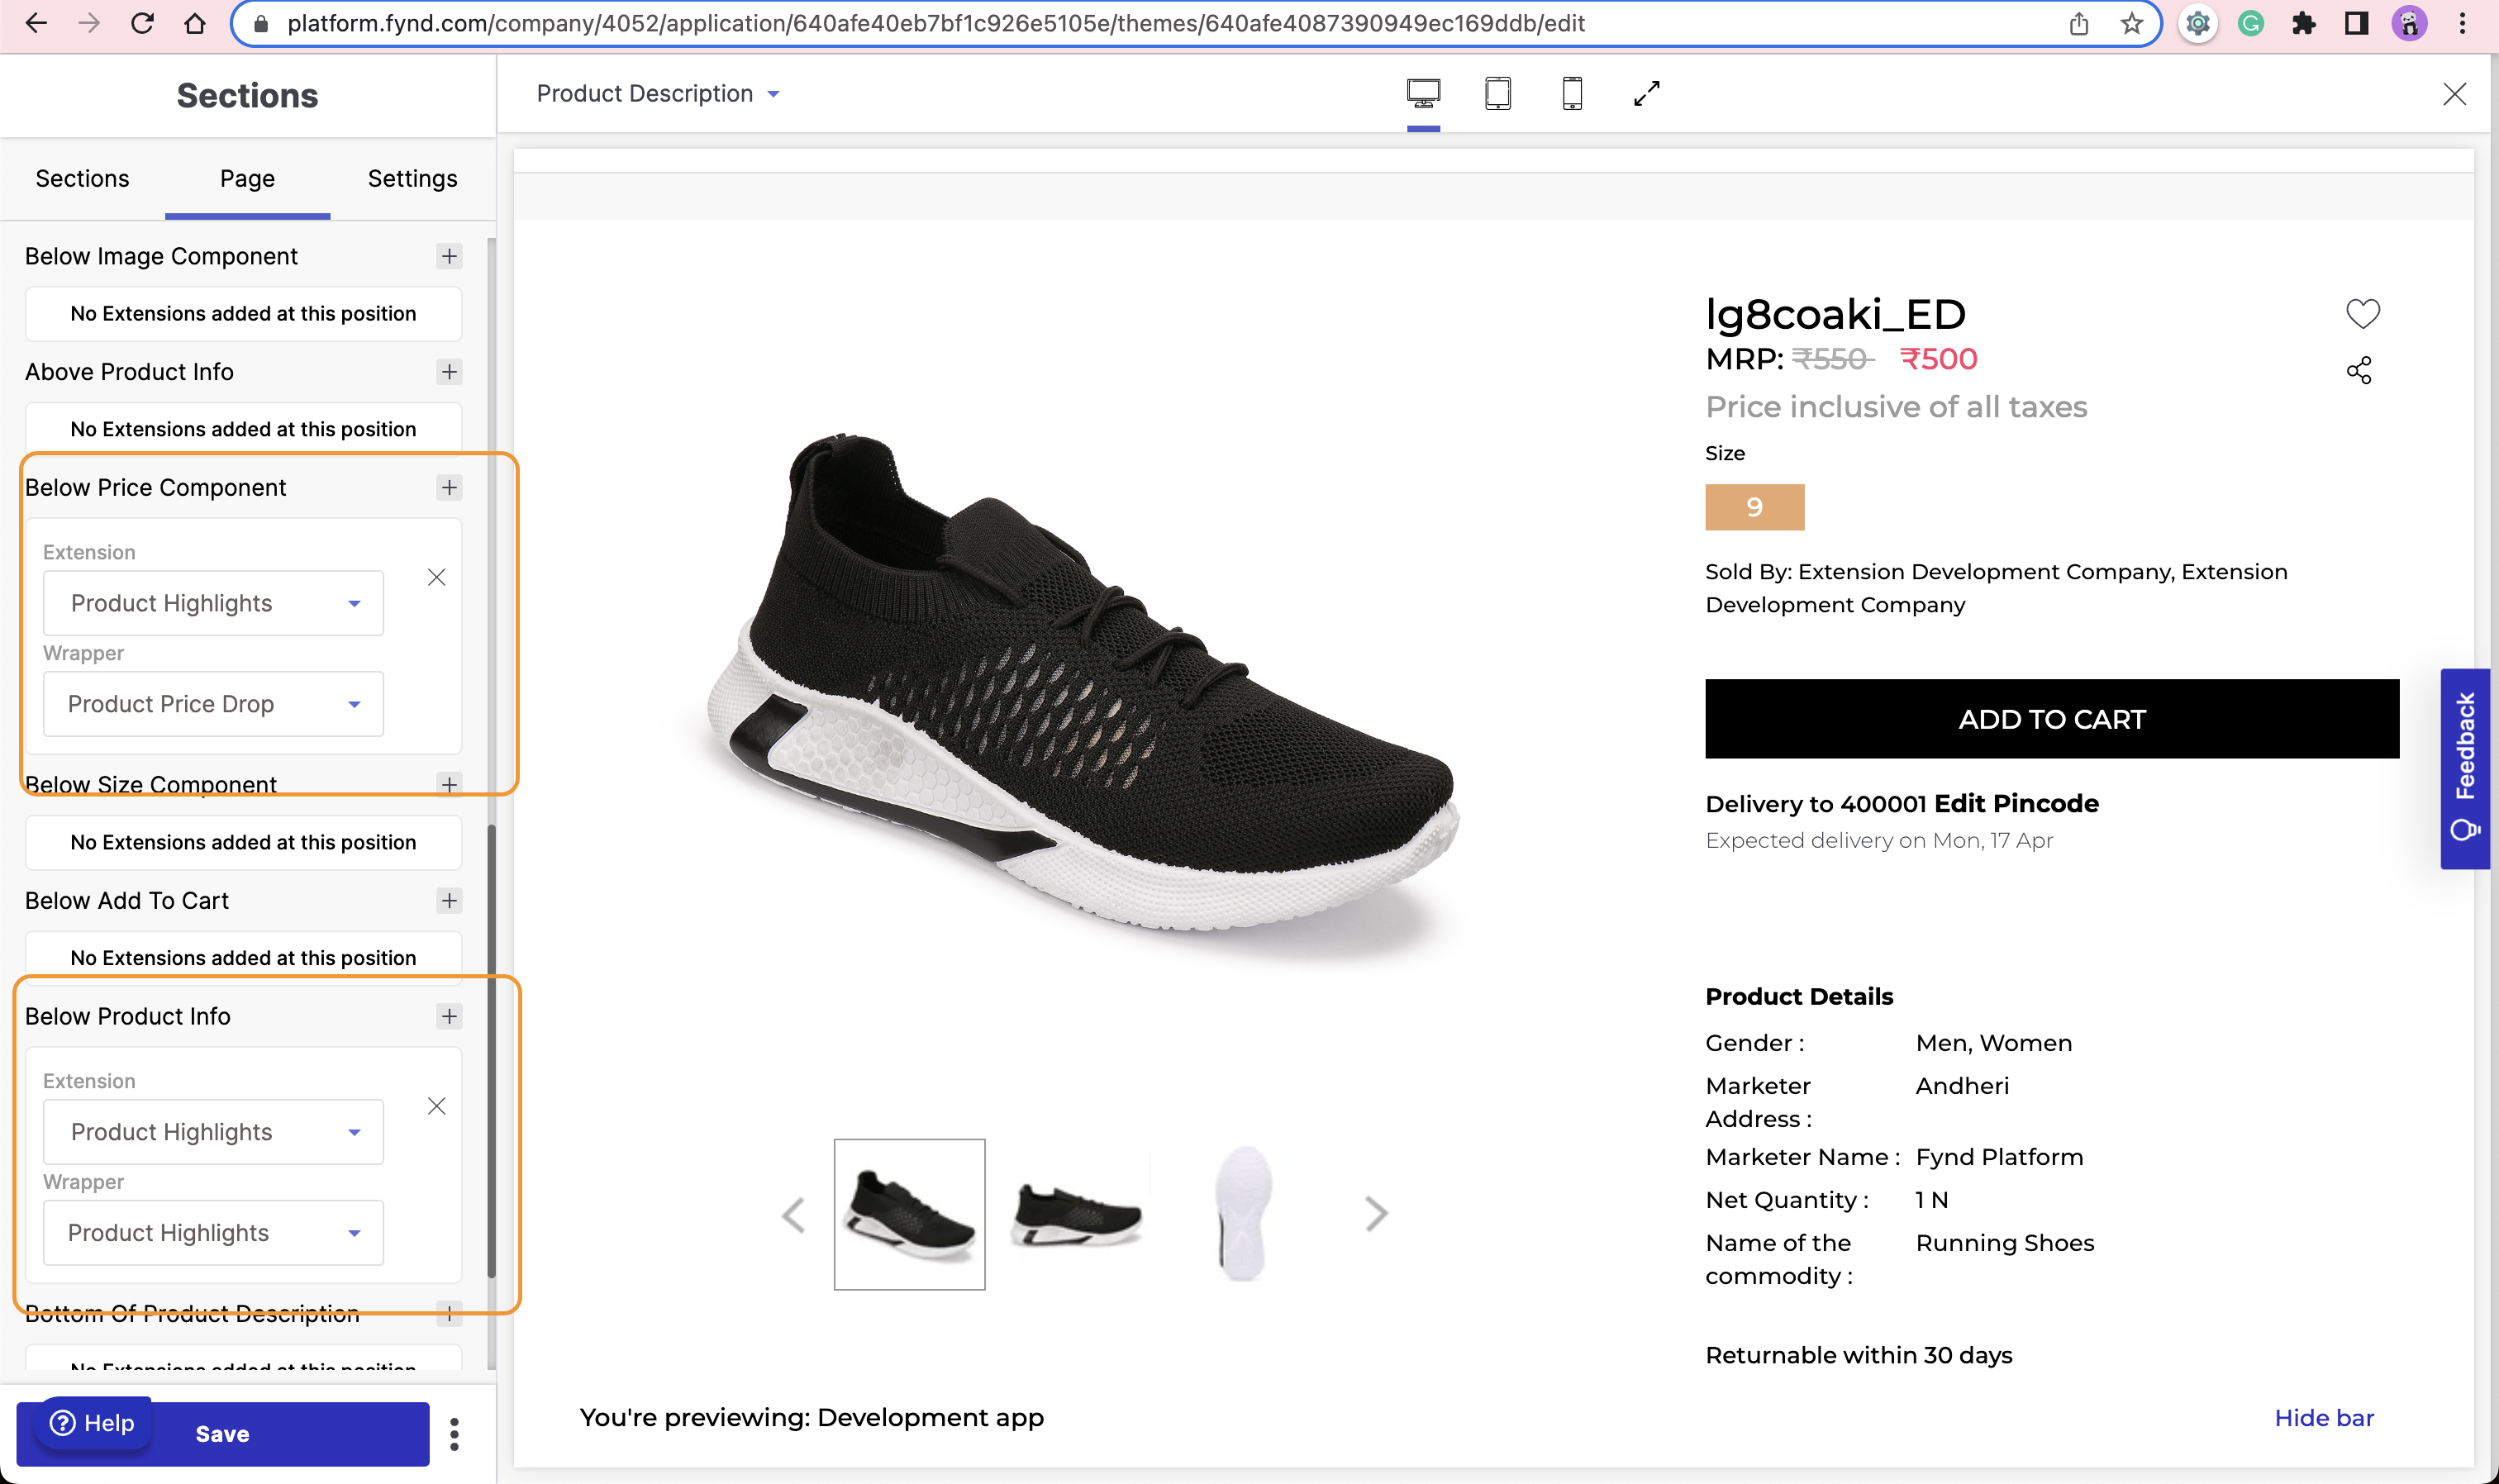
-
Click Save.
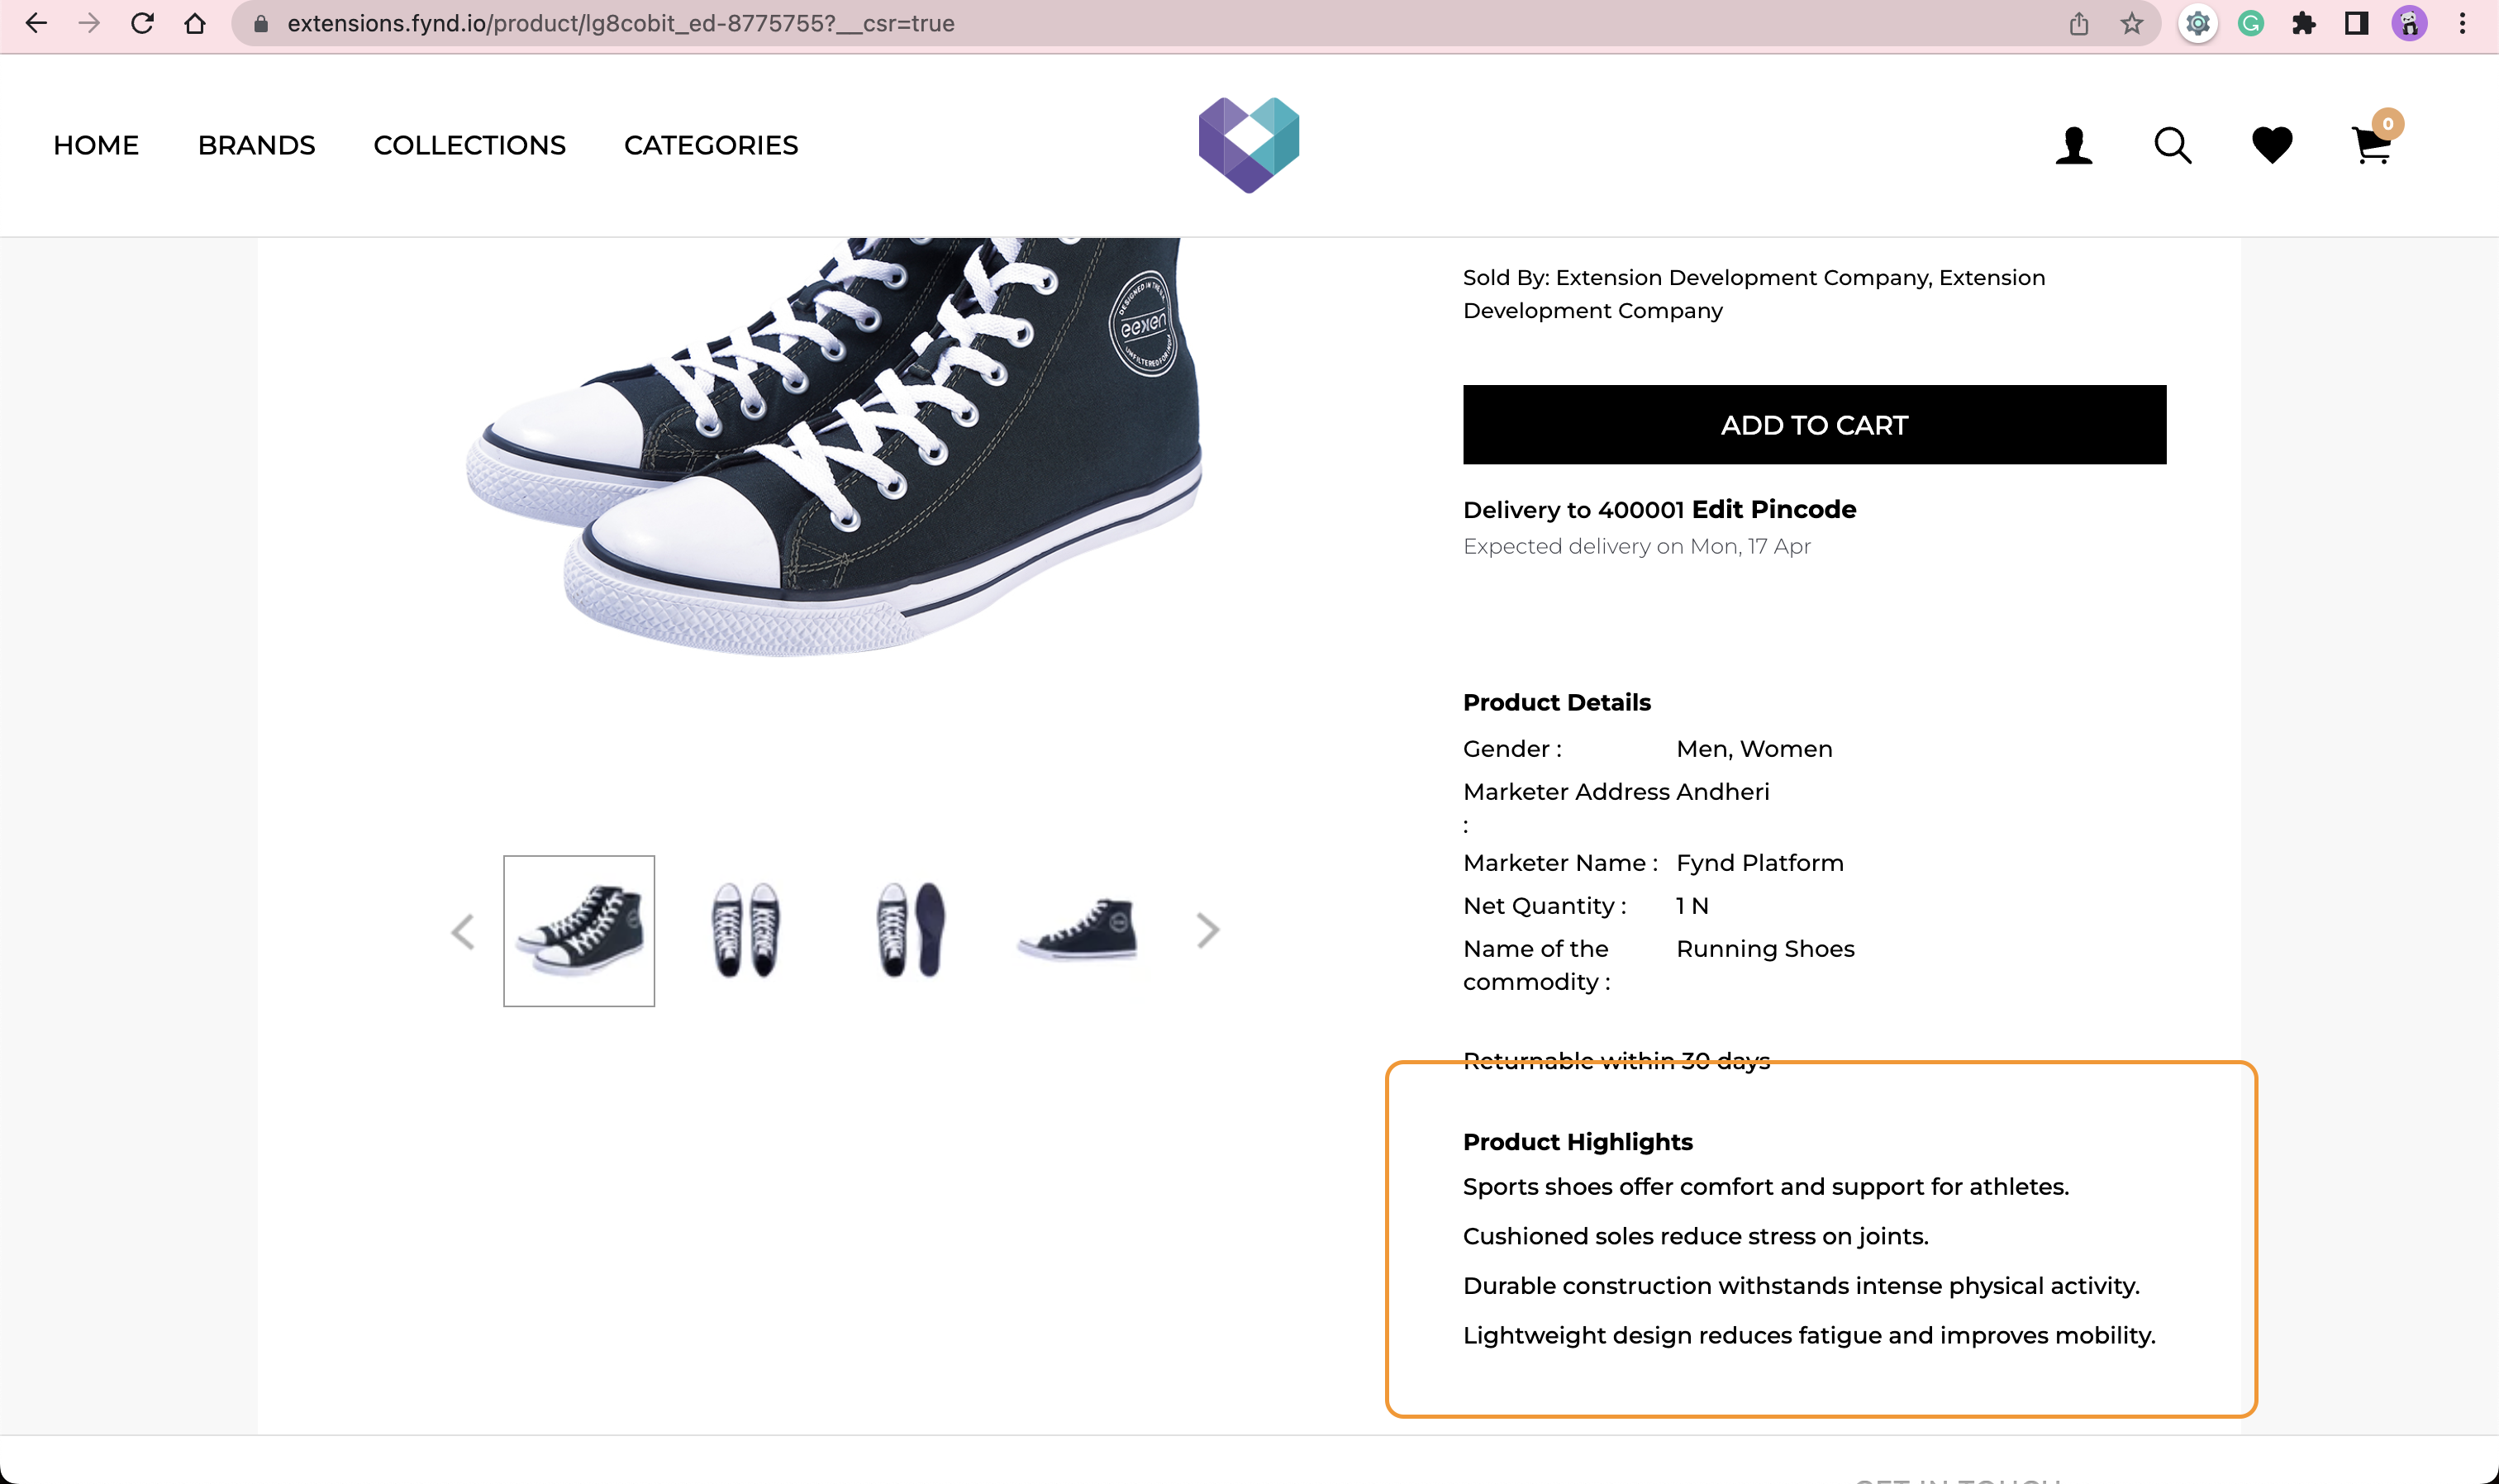
Now, visit the PDP page of the product for which you have activated highlights. You should be able to get see the highlight below Product Info.
Configuring Webhook
-
Add Webhook config Object in your
/app/fdk/index.jsfile.const { setupFdk } = require("fdk-extension-javascript/express");
const { RedisStorage } = require("fdk-extension-javascript/express/storage");
const config = require("../config");
const { appRedis } = require("./../common/redis.init");
const { productPriceUpdateHandler } = require('../webhook')
let fdkExtension = setupFdk({
api_key: config.extension.api_key,
api_secret: config.extension.api_secret,
base_url: config.extension.base_url,
callbacks: {
auth: async (req) => {
// Write your code here to return initial launch url after auth process complete
return `${req.extension.base_url}/company/${req.query['company_id']}`;
},
uninstall: async (req) => {
// Write your code here to cleanup data related to extension
// If task is time taking then process it async on other process.
}
},
// debug: true,
storage: new RedisStorage(appRedis,"product-highlights-ext"), // add your prefix
access_mode: "offline",
cluster: config.extension.fp_api_server,
webhook_config: {
api_path: "/ext/product-highlight-webhook",
notification_email: "meetkoriya@fynd.com",
event_map: {
"company/article/update": {
"handler": productPriceUpdateHandler,
"version": '1'
}
}
}
});
module.exports = fdkExtension; -
Create
productPriceUpdateHandlerfunction inside a new file/app/webhook.jsand add following code:const { ProductHighlightRecord, PriceDropRecord } = require('./db/mongo')
const productPriceUpdateHandler = async (eventName, { payload }, companyId, applicationId) => {
// check if payload has articles object or not
// if not exists then return
if (!payload.articles) {
return
} else {
payload.articles.forEach(async (article) => {
// fetch record from database
let data = await ProductHighlightRecord.findOne(
{company_id: companyId, product_item_code: article.item_id}
)
// check if data is there and price is also there or not
if (data && data.product.price ) {
// get old and new price
let previousPrice = data.product.price.effective
let newPrice = article.price.effective.max
// compare both price
if (previousPrice !== newPrice) {
// if price is decreased
if (newPrice < previousPrice || newPrice < previousPrice) {
// saving price drop with TTL of 2 days
await new PriceDropRecord({product_slug: data.product_slug}).save();
}
// update record with new price
data.product.price.effective.max = newPrice
data.product.price.effective.min = newPrice
await data.save();
}
}
})
}
}
module.exports = { productPriceUpdateHandler }; -
We'll need to create one POST API for listening to Webhook Event.
-
Add the following API code to
/app/server.jsfile:// webhook handler
app.post('/ext/product-highlight-webhook', async function(req, res) {
try {
console.log(`Webhook Event: ${req.body.event} received`)
await fdkExtension.webhookRegistry.processWebhook(req);
return res.status(200).json({"success": true});
} catch(err) {
console.log(`Error Processing ${req.body.event} Webhook`);
return res.status(500).json({"success": false});
}
})
Restart the Extension Server and Relaunch the Extension
You can test if Webhook is working or not by updating the price for one of the products for which you have checked enabled price drop from the Extension. Make sure the tunnel and Extension Server keeps running.
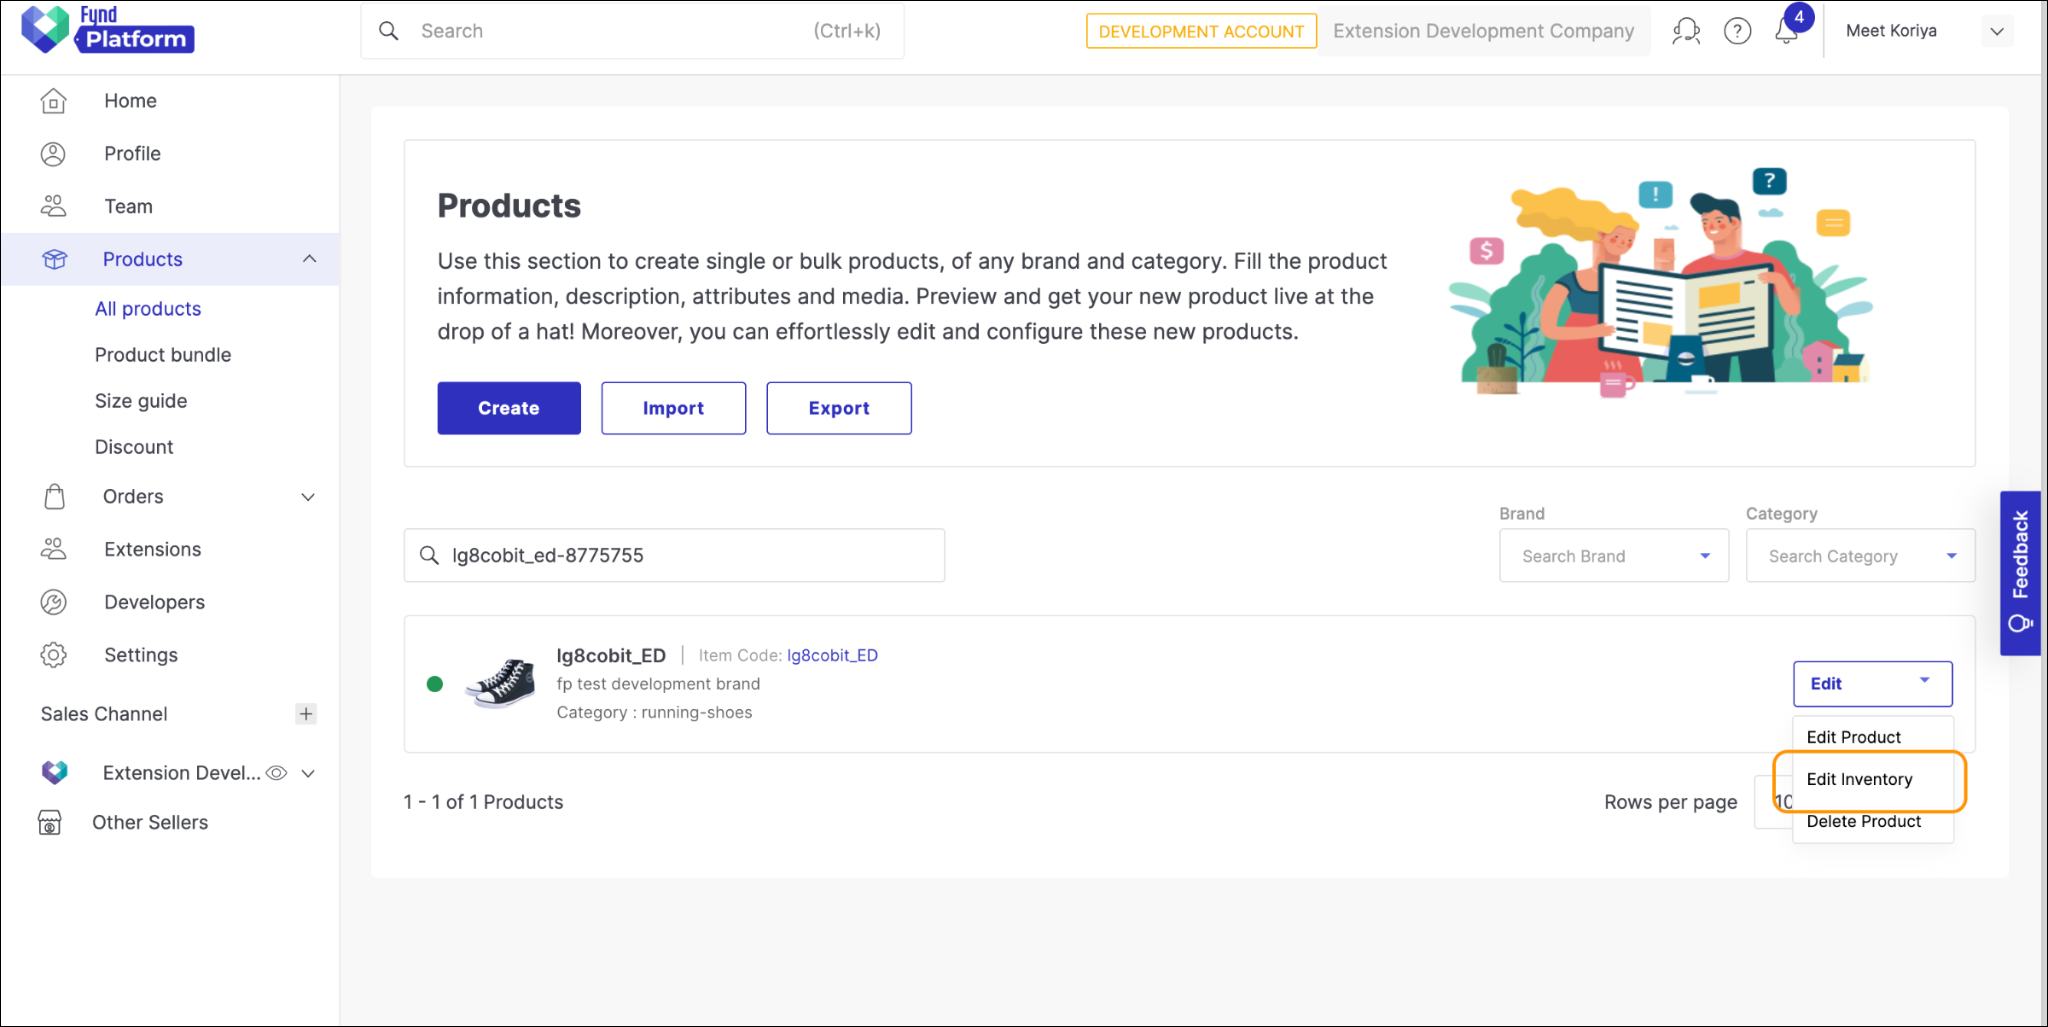
Update the price of the product from the Platform Panel
Products > All Products > Search Product by slug > Edit Inventory
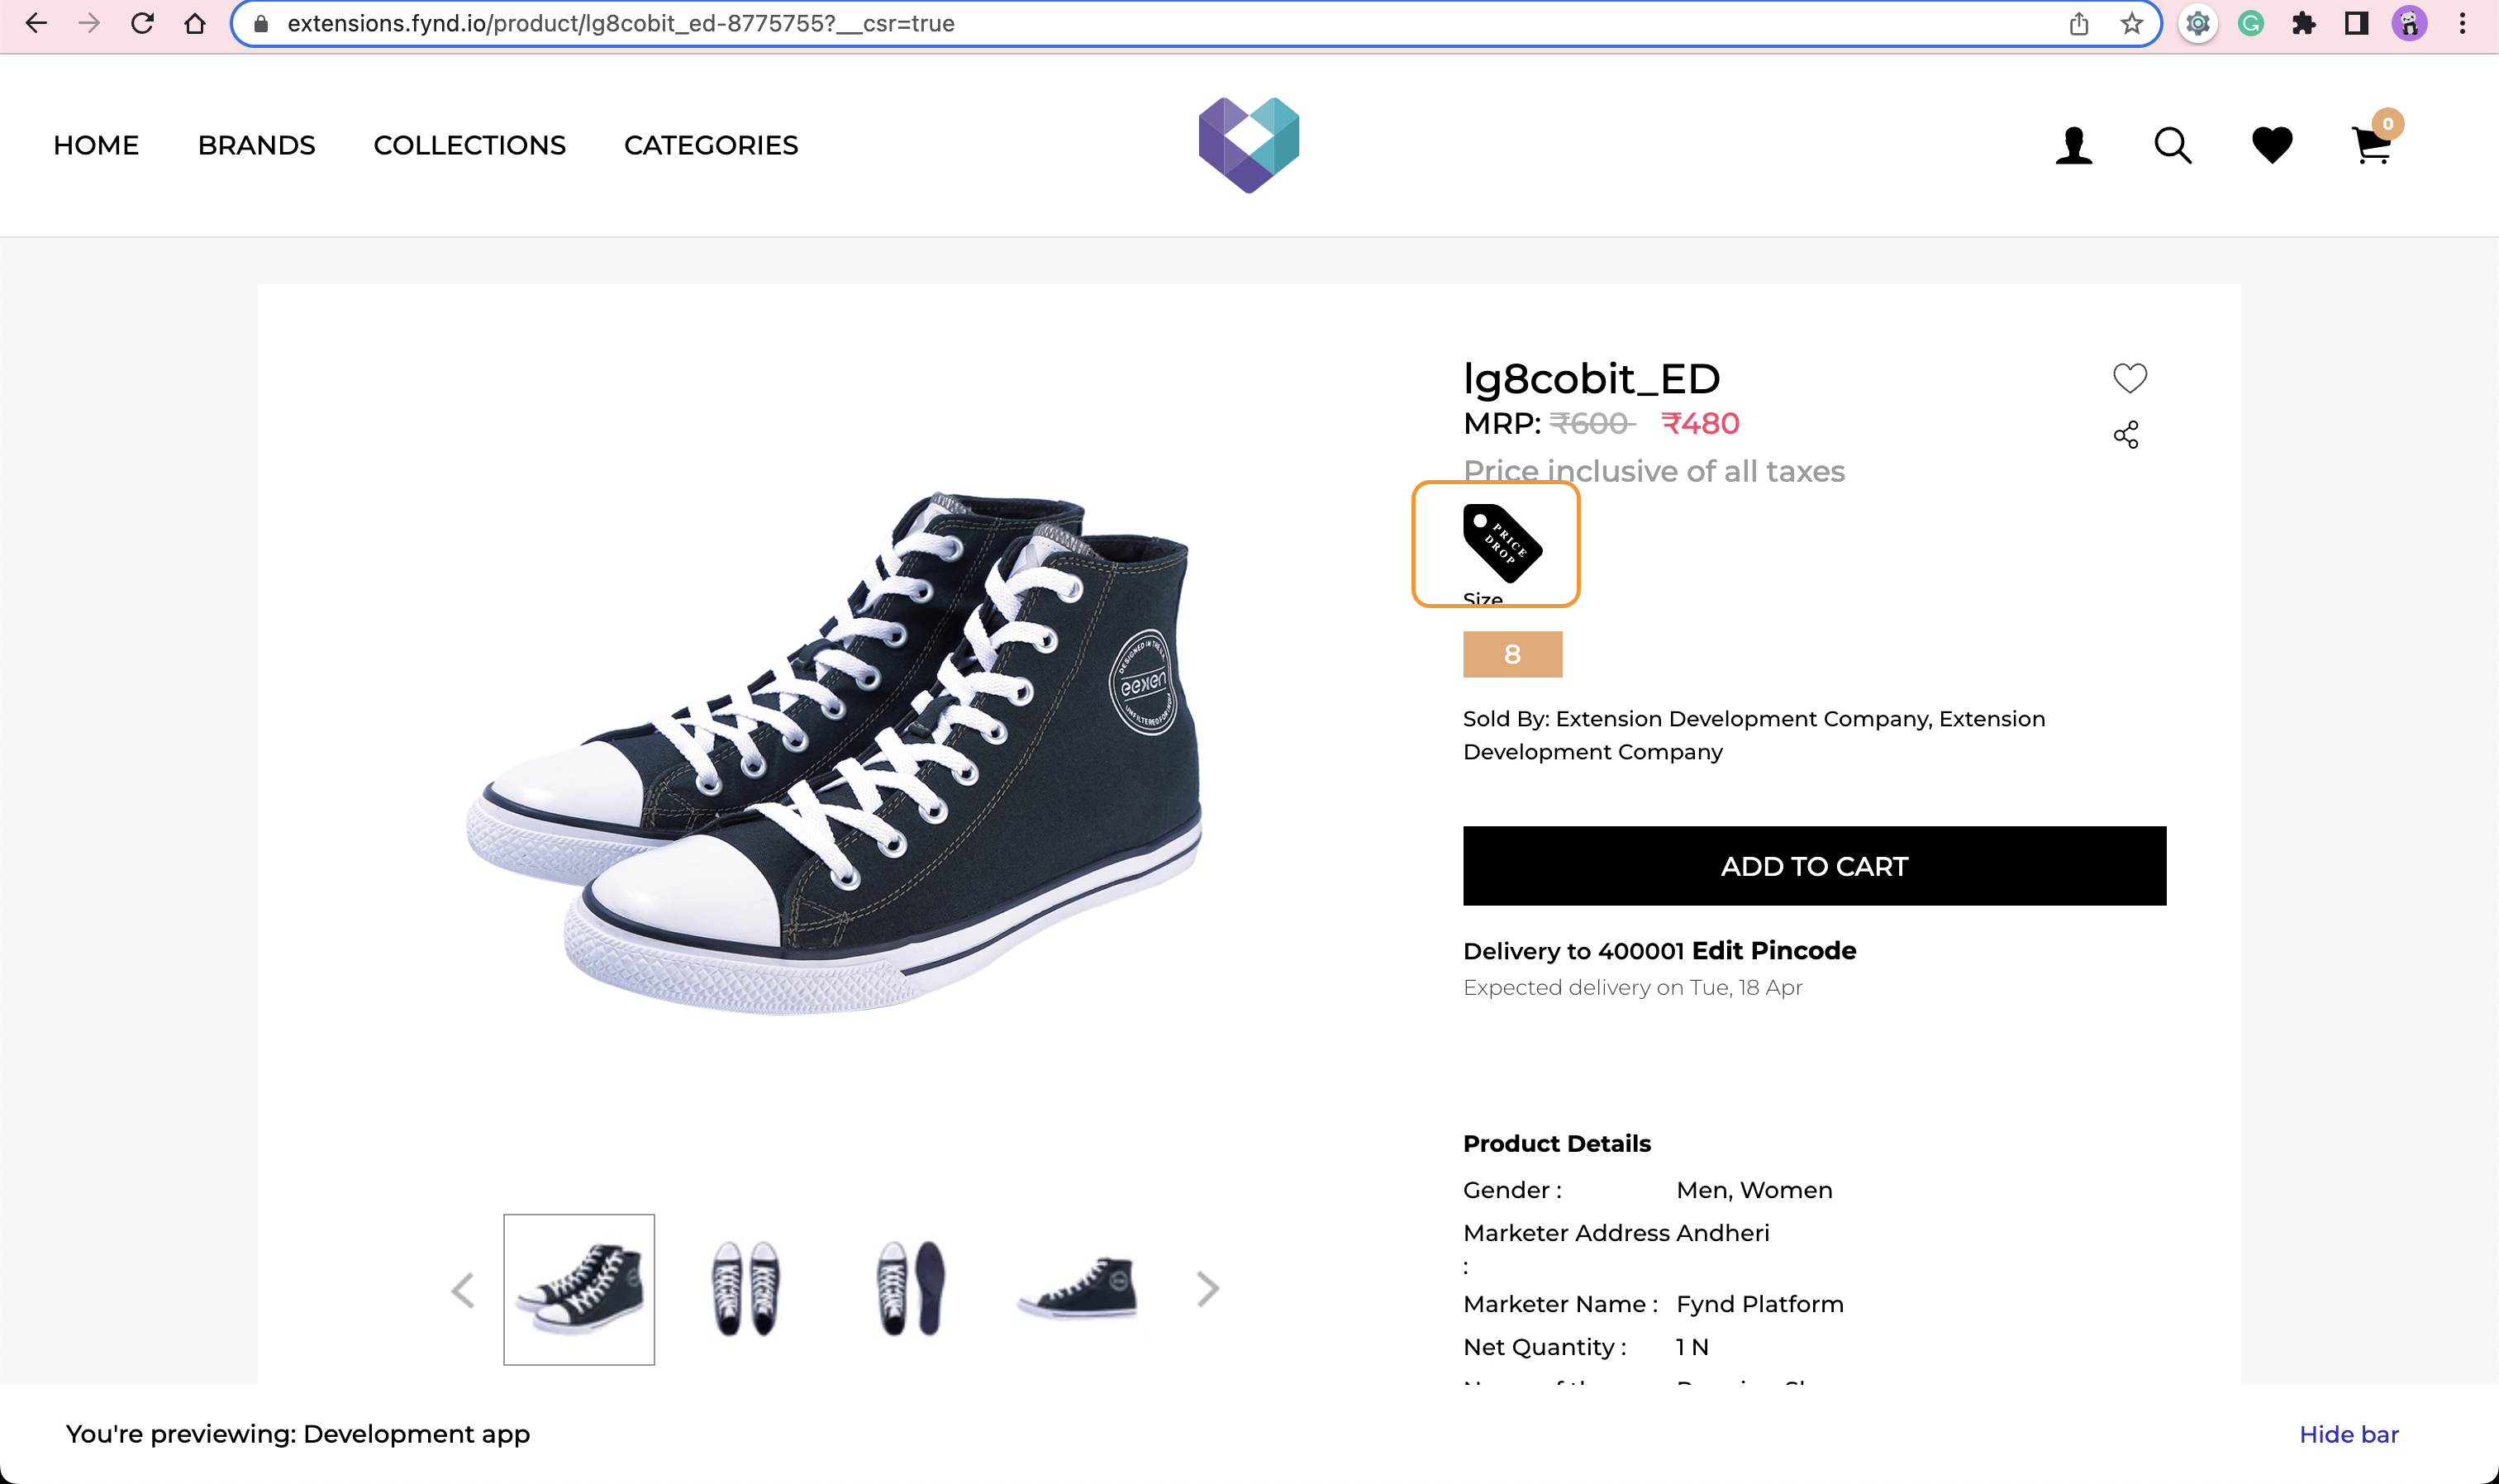
Decrease the selling price of the product
After waiting for some time visit the PDP of the same product. You should be able to see the Price Drop tag below the price components.
At Last, we will need to handle the Uninstall event of the Extension
Open /app/fdk/index.js file, and add the following code to the uninstall callback function.
// Write your code here to cleanup data related to extension
// If task is time taking then process it async on other process.
const { company_id } = req.body;
const { ProductHighlightRecord, ProxyRecord } = require('../db/mongo')
await ProductHighlightRecord.bulkWrite([{
    updateMany: {
        "filter": {
            "company_id": company_id
        },
        "update": {
            $set: {
                "is_active": false
            }
        }
    }
}]);
await ProxyRecord.deleteMany({ company_id: company_id });