Proxy URLs
Overview
Proxy URLs are commonly used in browser Extensions to send network requests on behalf of the user. Some Extensions need to access resources on remote servers that may be blocked by the user's network, or restricted based on the user's location or IP address. By using a proxy server, the Extension can route its network requests through a different IP address or location, bypassing these network or server restrictions.
Additionally, a proxy server can help protect the user's privacy by masking their IP address. This prevents the user from being tracked or identified by the server based on their IP address.
Overall, using a proxy URL in Extensions offers several benefits, including improved network accessibility, enhanced privacy, and increased security.
Scenario
-
A Proxy URL can bypass CORS errors by acting as an intermediary between the browser and the API. It forwards requests from the browser to the API via the Proxy URL, helping to avoid cross-origin issues.
-
A Proxy URL can also be used to publish or inject custom pages on a sales channel or website. It does this by intercepting storefront requests and redirecting them to custom pages or functionalities, without requiring direct access to the storefront's API.
Architecture
The following sequence diagram illustrates the API call flow using a proxy.
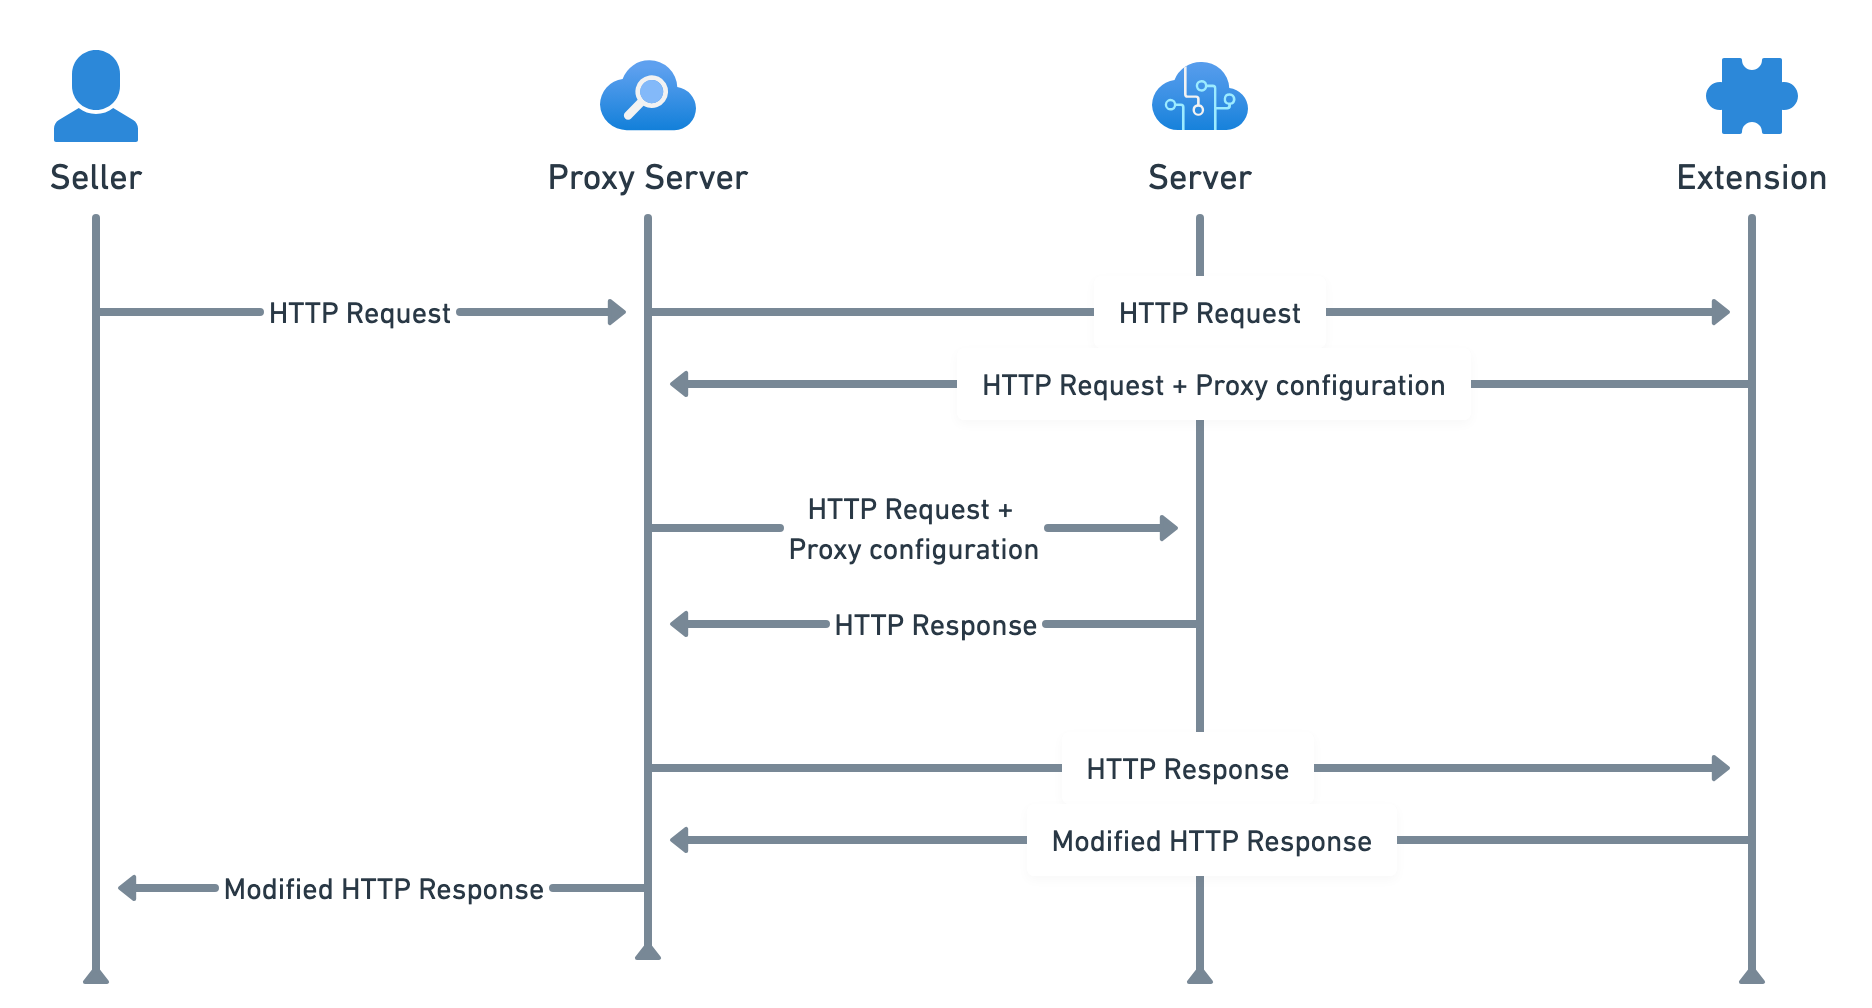
- A seller initiates an HTTP request using their browser, which is sent to a proxy server.
- The proxy server sends the HTTP request to the Extension and obtains the proxy configuration.
- The proxy server sends both the HTTP request and the proxy configuration to the destination server, which responds with an HTTP response.
- The proxy server sends the received HTTP response to the Extension.
- The Extension modifies the response and sends it back to the proxy server.
- Finally, the browser receives the modified HTTP response from the proxy server, which it then displays to the user.
Create a Proxy URL
For creating a proxy URL, Extension developers have to integrate the SDK method addProxyPath, in which they are required to provide Extension API key, attached_path and the Extension launch URL.
const promise = client.application("<application_id>").partner.addProxyPath({
    extensionId,
    body: {
        attached_path,
        proxy_url,
    },
});
// OR using await
const data = await client.application("<application_id>").partner.addProxyPath({...})
Let’s break down each component of this code:
| Description | |
|---|---|
.application(id) | This creates an instance of the application for the given id that the client is authorized to access. |
.addProxyPath({...}) | This method allows the user to add a new proxy path to their application. |
extensionId | This specifies the Extension ID associated with the proxy path. |
attached_path | This is the path on the partner server to which the proxy is attached. |
proxy_url | This is the URL of the proxy server. |
Sample Response:
{
    _id: "607406b8a472cd527303692f",
    attached_path: "test",
    proxy_url: "https://www.abc.com",
    company_id: "1",
    application_id: "000000000000000000000004",
    extension_id: "6073280be899ea5b1150fd9d",
    created_at: "2021-04-12T08:37:12.077Z",
    modified_at: "2021-04-12T08:37:12.077Z"
}
Example
URL Format: {application_url}/ext/{attached_path}
For example, an app proxy configuration with attached_path: "test", proxy_url: "abc.com", and application_url: "xyz.com" the final URL would be xyz.com/ext/test.
Remove a Proxy URL
To remove a particular proxy path of an Extension from an application, you can call the removeProxyPath() method.
const promise = client.application("<application_id>").partner.removeProxyPath({
    extensionId: value,
    attachedPath: value,
});
// OR using await
const data = await client.application("<application_id>").partner.removeProxyPath({
Sample Response:
{
    "message": "Proxy URL deleted",
    "data": {...}  // Same as the response for proxy cretion
}
The term cluster_domain is reserved for internal use by our system, so avoid using it as a query parameter in your API calls to the proxy. If you include it, the value will be replaced to platform.fynd.com by the proxy server.
Webhook config
In the context of handling triggered events, webhooks are often associated with payloads. When an extension is uninstalled, it triggers an uninstallation event and sends a notification to the extension server. This process effectively removes any proxy paths linked to the company ID associated with that extension. To know more, read payload of an extension uninstallation.
You can subscribe to the events by passing the 'webhook_config' parameter in the setupFdk function.
let fdkExtension = setupFdk({
    api_key: config.extension.api_key,
    api_secret: config.extension.api_secret,
    base_url: config.extension.base_url,
    scopes: ["company/saleschannel", "company/application/settings"], // add your scopes
    callbacks: {
        auth: async (req) => {
            // Write your code here to return initial launch url after auth process complete
            return `${req.extension.base_url}/company/${req.query['company_id']}`;
        },

        uninstall: async (req) => {
            // Write your code here to cleanup data related to extension.
            // If task is time taking then process it async on other process.
        }
    },
    storage: new RedisStorage(appRedis,"example-fynd-platform-extension"), // add your prefix
    access_mode: "offline",
    cluster:  config.extension.fp_api_server,// this is optional by default it points to prod.
    //debug: true
    webhook_config: {
        api_path: "/webhook",
        notification_email: "<email>",
        event_map: {
            "company/extension/uninstall":{
                "handler": extensionUninstallHandler,
                "version": '1'
            }
        }
    }
});