Kafka broadcaster setup guide
Introduction
This comprehensive guide will walk you through the detailed process of configuring and setting up the Kafka Broadcaster feature. This feature facilitates the seamless broadcasting of platform events on your Kafka topics.
Steps to Configure Kafka Broadcaster
Step 1: Accessing Kafka Broadcaster
To access the Kafka Broadcaster, follow these simple steps:
- Log in to the Fynd Partners Panel.
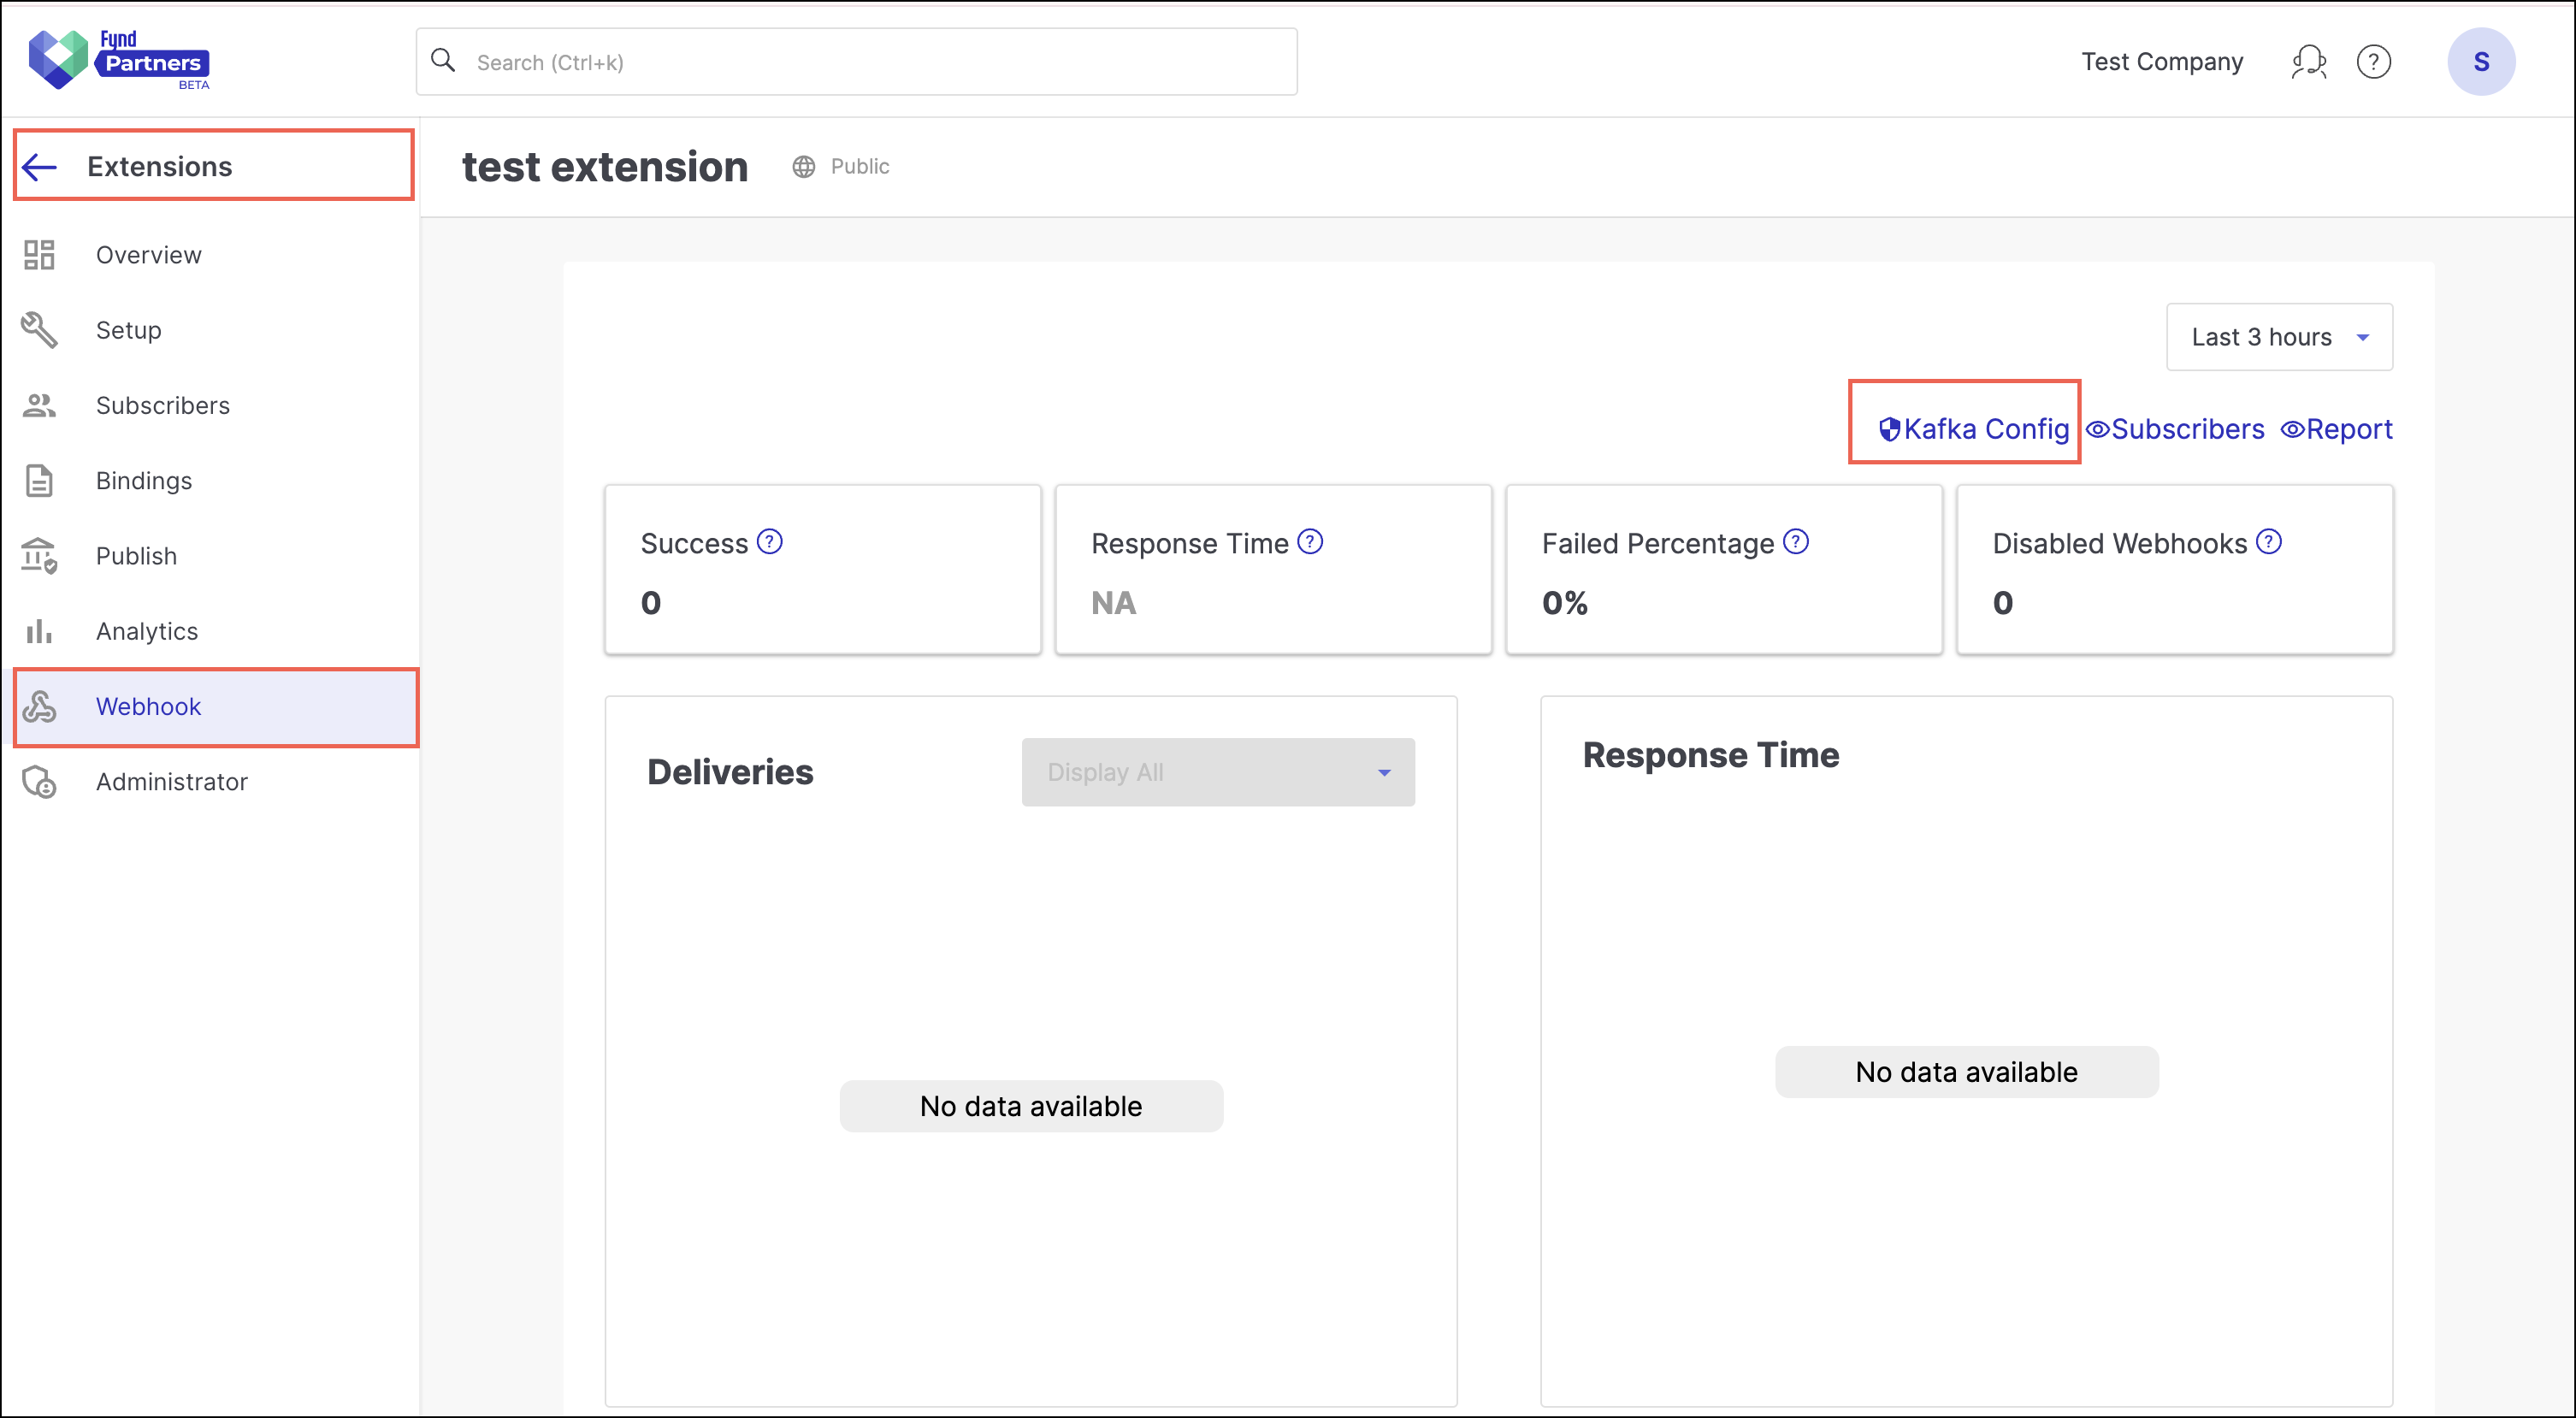
- Go to Extensions, and select any extension.
- Under the respective extension, click Webhook.
- In the Webhook section, go to Kafka Config located at the top-right corner.
- You will be directed to the Kafka Config.
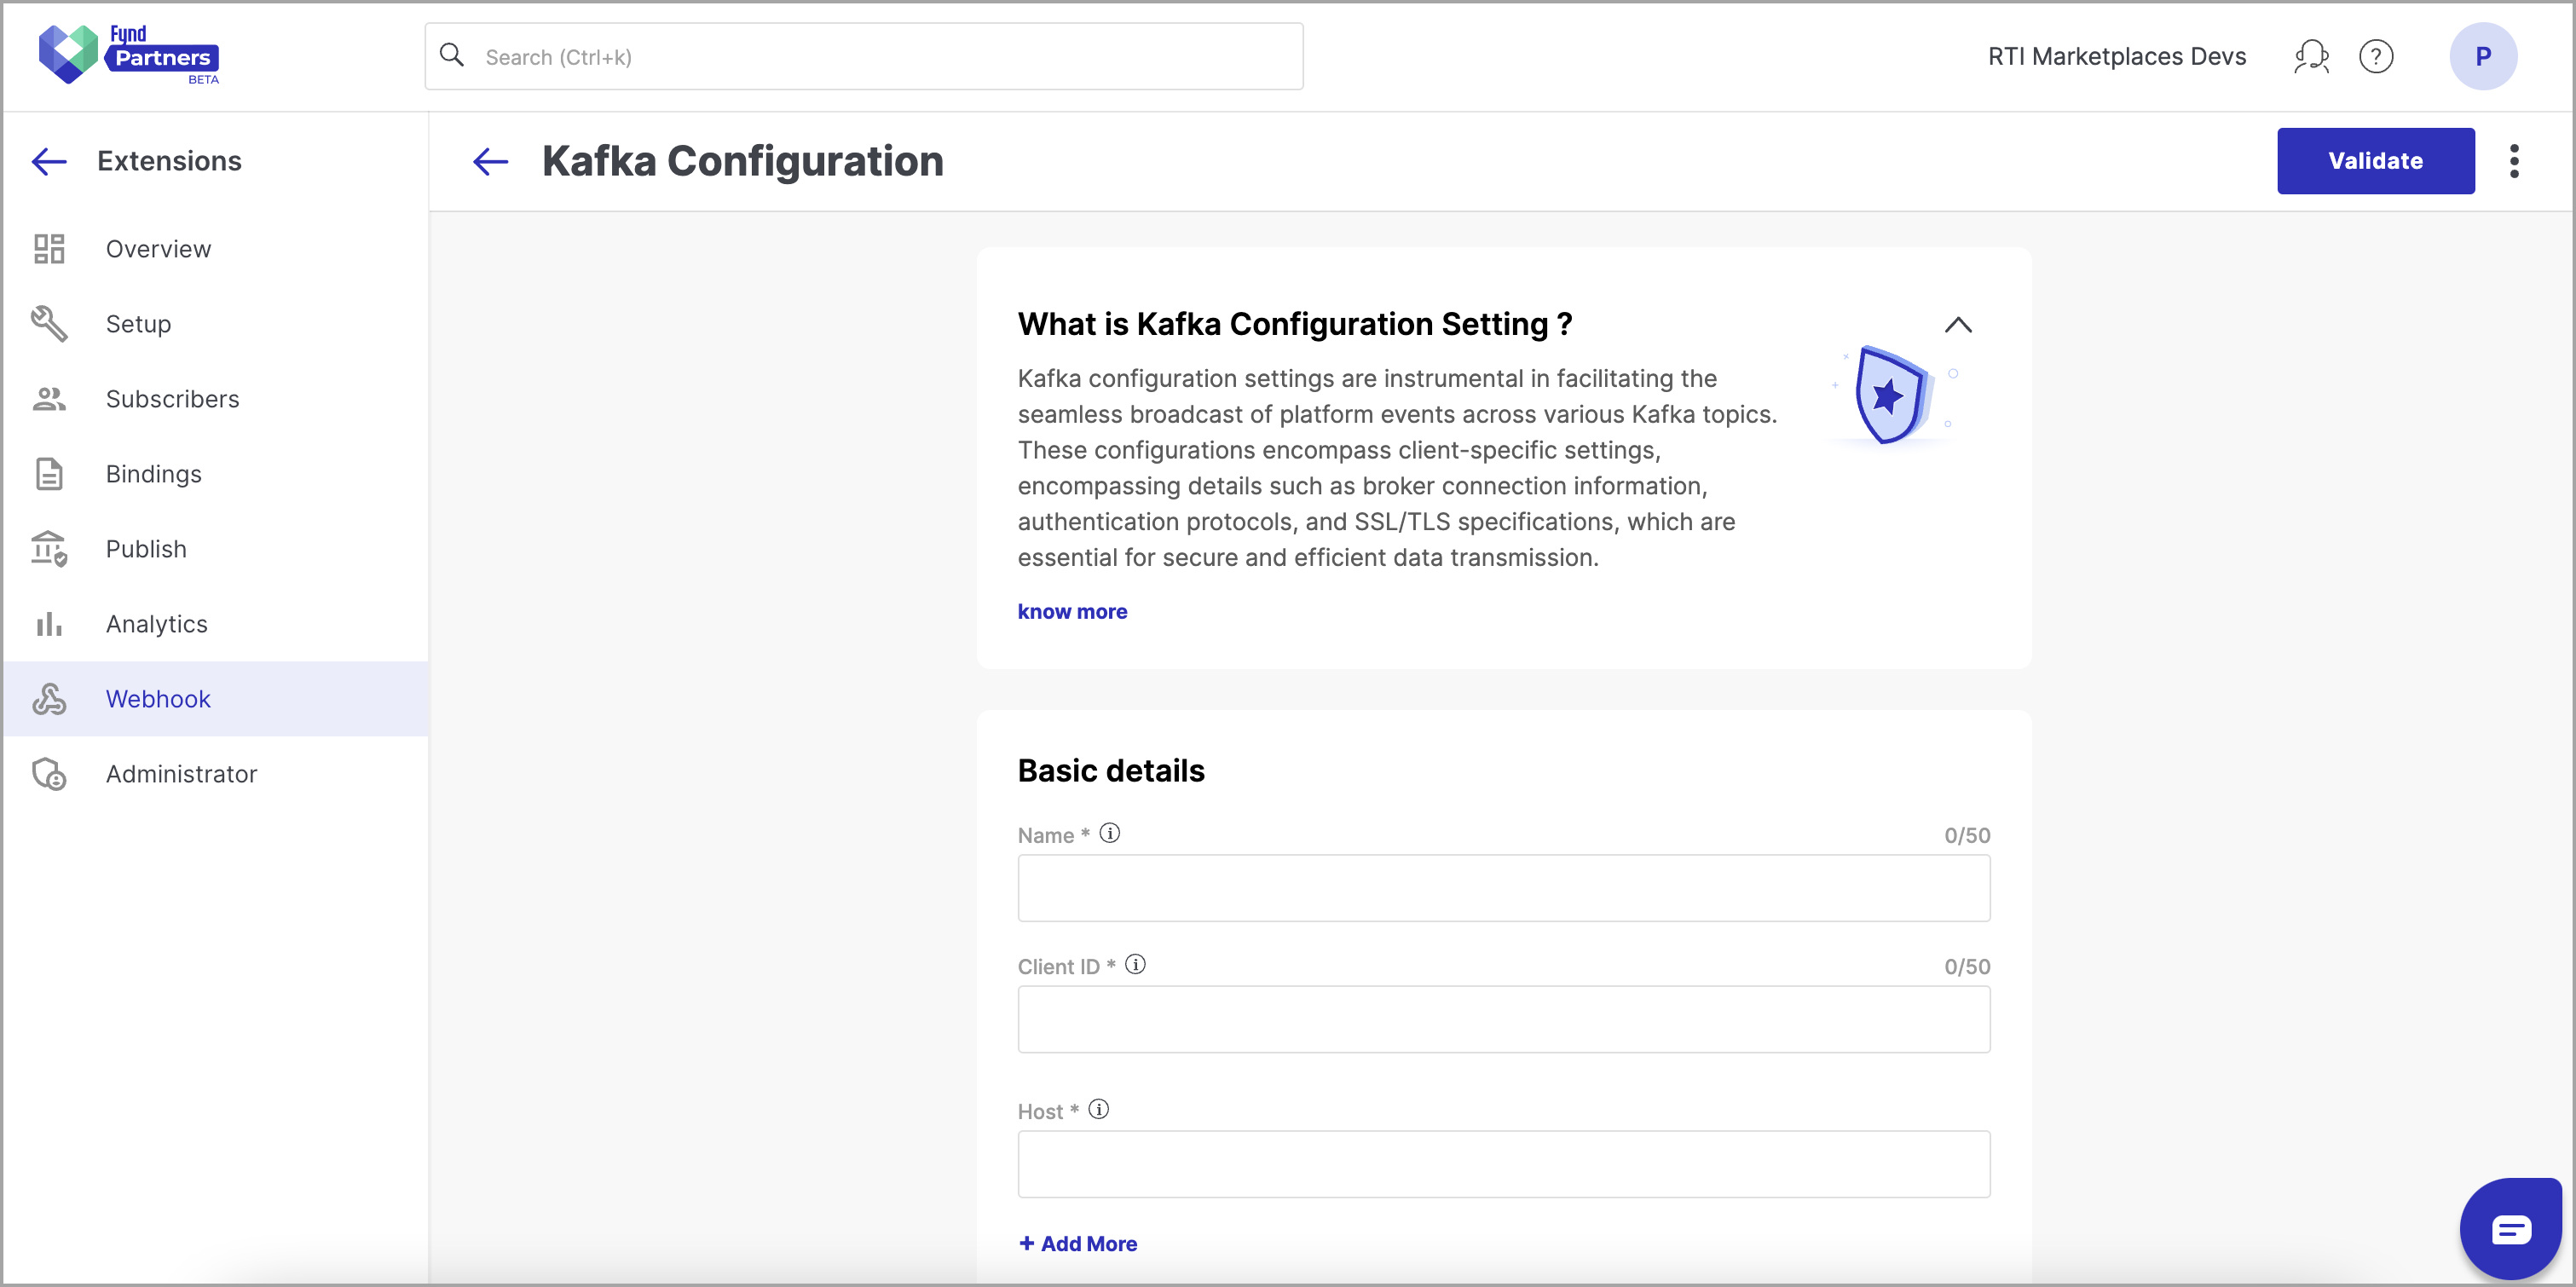
Step 2: Configuring Kafka Broadcaster
Here, fill in the following details and click on Validate:
- Name: Provide a name for identification.
- Client ID: Enter a unique client ID.
- Host: Specify the host details. You can add multiple hosts by clicking
+Add More. You can only add a maximum of three hosts. - Connection Timeout: Set the connection timeout duration in ms. The default timeout is 1000 ms.
- Authentication Timeout: Define the authentication timeout in ms. The default timeout is 1000 ms.
- Request Timeout: Specify the request timeout in ms. The default timeout is 30000 ms.
Enable the below features and fill in the details
- SSL Details: SSL (Secure Sockets Layer) is used for secure communication between the client and the Kafka broker. Three files are typically required for SSL configuration:
- Certificate file (
cert): This represents the client's public certificate in PEM format. It includes the client's public key and is presented to the Kafka brokers during the SSL/TLS handshake. The brokers use this certificate (and the CA certificates they trust) to authenticate the client. - Key file (
key): This is the client's private key, which, along with the client certificate (cert), is used for client authentication by the Kafka brokers. - CA (Certificate Authority) file (
ca): Contains the public key of the CA that signed the broker's certificate.
.png)
- SASL Configuration: SASL is a framework for authentication and security in network protocols. In the context of Kafka, it's often used for secure authentication. SASL can be configured in three types:
- PLAIN: This is a simple username/password-based mechanism.
- AWS: SASL configuration can be adapted for authentication with AWS (Amazon Web Services) credentials.
- OAuthBearer: SASL can be configured to use OAuthBearer tokens for authentication.
.png)
- SSL or SASL configurations will only be necessary when the Kafka broker or host requires such security and authentication measures for establishing a connection.
- If the broker is set up with SSL or SASL requirements, the client connecting to it needs to provide the appropriate configuration.
Step 3: Validation
- Click Validate.
- Platform will validate the provided kafka information by establishing temporary connection.
- On successful validation, Click Save.
- Once registered and validated, partners gain access to the Kafka cluster configuration and authentication information. The specific name of the Kafka topic is obtained from the extension.
:::note A pop-up will appear, indicating Validation Successful if the entered details are valid. :::
Step 4: Event Registration
- Register events and respective topics in extension initialization.
curl --location '{{HOST}}/v2.0/company/1/subscriber' \
--header 'Content-Type: application/json' \
--data-raw '{
  "name": "Ginesys subscriber 2",
  "provider": "kafka",
  "association": {
    "company_id": 1,
    "criteria": "ALL",
    "application_id": ["6369fc8124ab1b2008130d8a"]
  },
  "custom_headers": {},
  "status": "active",
  "email_id": "[email protected]",
  "auth_meta": {},
  "events": [
    {
      "slug": "application/courier-partner/assign/v1",
      "topic":"fynd-json-broadcaster-cp-event"
    },
    {
      "slug": "company/location/update/v1"
    },
    {
      "slug": "company/company/update/v1"
    }
  ]
}'
topic is optional
- The events field includes an array of events, each specified by its slug. Optionally, you can provide a topic for each event. If not provided, a default topic will be generated the name of the default topic will be derived from the event name and category i.e. for application level courier-partner event default topic name will be
fynd-json-broadcast-application-courier-partner.
OR
- Refer here to learn how to register for webhook events using extension library.
Consuming Events
Once Kafka Broadcaster is validated on the Partner Panel, set up the Kafka-based event system where events related to updating articles for a company trigger notifications or actions, and these events are consumed by subscribers.
Following are the JSON payloads for the POST and UPDATE operations to set up a Kafka-based event system.
For example, upon accessing the "CommonBroadcasterTopic," you observe events like "NewOrderReceived" and "PaymentProcessed." Implement your application logic to consume and respond to these events accordingly.
Conclusion
Congratulations! You have successfully configured the Kafka Broadcaster feature, enabling seamless event broadcasting for effective collaboration with Fynd Platform. Should you encounter any issues or have additional questions, our support team is ready to assist.